OkHttp
请求器和请求对象
使用OkHttp发送网络请求,最重要的是OkHttpClient和Request这两个类,前者是请求器,后者是请求对象。
1
2
3
4
|
OkHttpClient okHttpClient = new OkHttpClient.Builder().build();
Request.Builder builder = new Request.Builder();
|
确定请求地址和请求方式后,再构建出请求对象,如下示例构建get请求对象
1
2
3
| Request request = builder.url("https://m1.apifoxmock.com/m1/8092681-7849123-default/get/common")
.get()
.build();
|
发送get请求
通过请求器发送请求对象,得到一个Call对象,得到Call对象后可以选择执行同步请求或异步请求。
1
2
3
4
5
| Request request = builder.url("https://m1.apifoxmock.com/m1/8092681-7849123-default/get/common")
.get()
.build();
Call call = okHttpClient.newCall(request);
|
同步请求
同步请求会阻塞当前线程,直到请求完成,因此无法在主线程中执行
1
2
3
4
5
6
7
8
9
10
11
12
13
14
15
16
17
18
|
new Thread(() -> {
try (Response response = call.execute()) {
if (response.isSuccessful()) {
ResponseBody responseBody = response.body();
if (responseBody != null) {
LogUtil.d(TAG, "response: " + responseBody.string());
} else {
LogUtil.d(TAG, "response is null");
}
} else {
LogUtil.d(TAG, "response is not successful, code=" + response.code());
}
response.close();
} catch (IOException e) {
throw new RuntimeException(e);
}
}).start();
|
异步请求
异步请求不阻塞当前线程,发送异步请求需要传入一个Callback对象
1
2
3
4
5
6
7
8
9
10
11
12
13
14
15
16
17
18
19
20
21
| call.enqueue(new Callback() {
@Override
public void onFailure(@NonNull Call call, @NonNull IOException e) {
LogUtil.d(TAG, "onFailure: " + e.getMessage());
}
@Override
public void onResponse(@NonNull Call call, @NonNull Response response) throws IOException {
if (response.isSuccessful()) {
ResponseBody responseBody = response.body();
if (responseBody != null) {
LogUtil.d(TAG, "response: " + responseBody.string());
} else {
LogUtil.d(TAG, "response is null");
}
} else {
LogUtil.d(TAG, "response is not successful, code=" + response.code());
}
response.close();
}
});
|
发送post请求
发送post请求,在构建Request对象时,需要传入一个RequestBody对象,如下示例发送json数据
1
2
3
4
5
6
7
8
|
String json = "{ \"email\": \"x@xxin.xyz\", \"password\": \"123456\"}";
RequestBody requestBody = RequestBody.create(json, MediaType.get("application/json; charset=utf-8"));
Request request = builder.url("https://m1.apifoxmock.com/m1/8092681-7849123-default/post/login")
.post(requestBody)
.build();
Call call = okHttpClient.newCall(request);
|
发送表单数据
1
2
3
4
5
6
7
8
| RequestBody requestBody = new FormBody.Builder()
.add("email", "x@xxin.xyz")
.add("password", "123456")
.build();
Request request = builder.url("https://m1.apifoxmock.com/m1/8092681-7849123-default/post/login")
.post(requestBody)
.build();
Call call = okHttpClient.newCall(request);
|
同步、异步请求的发送方式与get请求相同,不再赘述
拦截器
Okhttp的拦截器采用责任链模式,每个拦截器通过chain.proceed(Request)把请求(Request对象)交给责任链中的下个拦截器处理,chain.proceed(Request)可以得到下个拦截器返回的响应(Response对象),并且需要把响应返回给上个拦截器。
OkHttp拦截器责任链的完整执行顺序如下
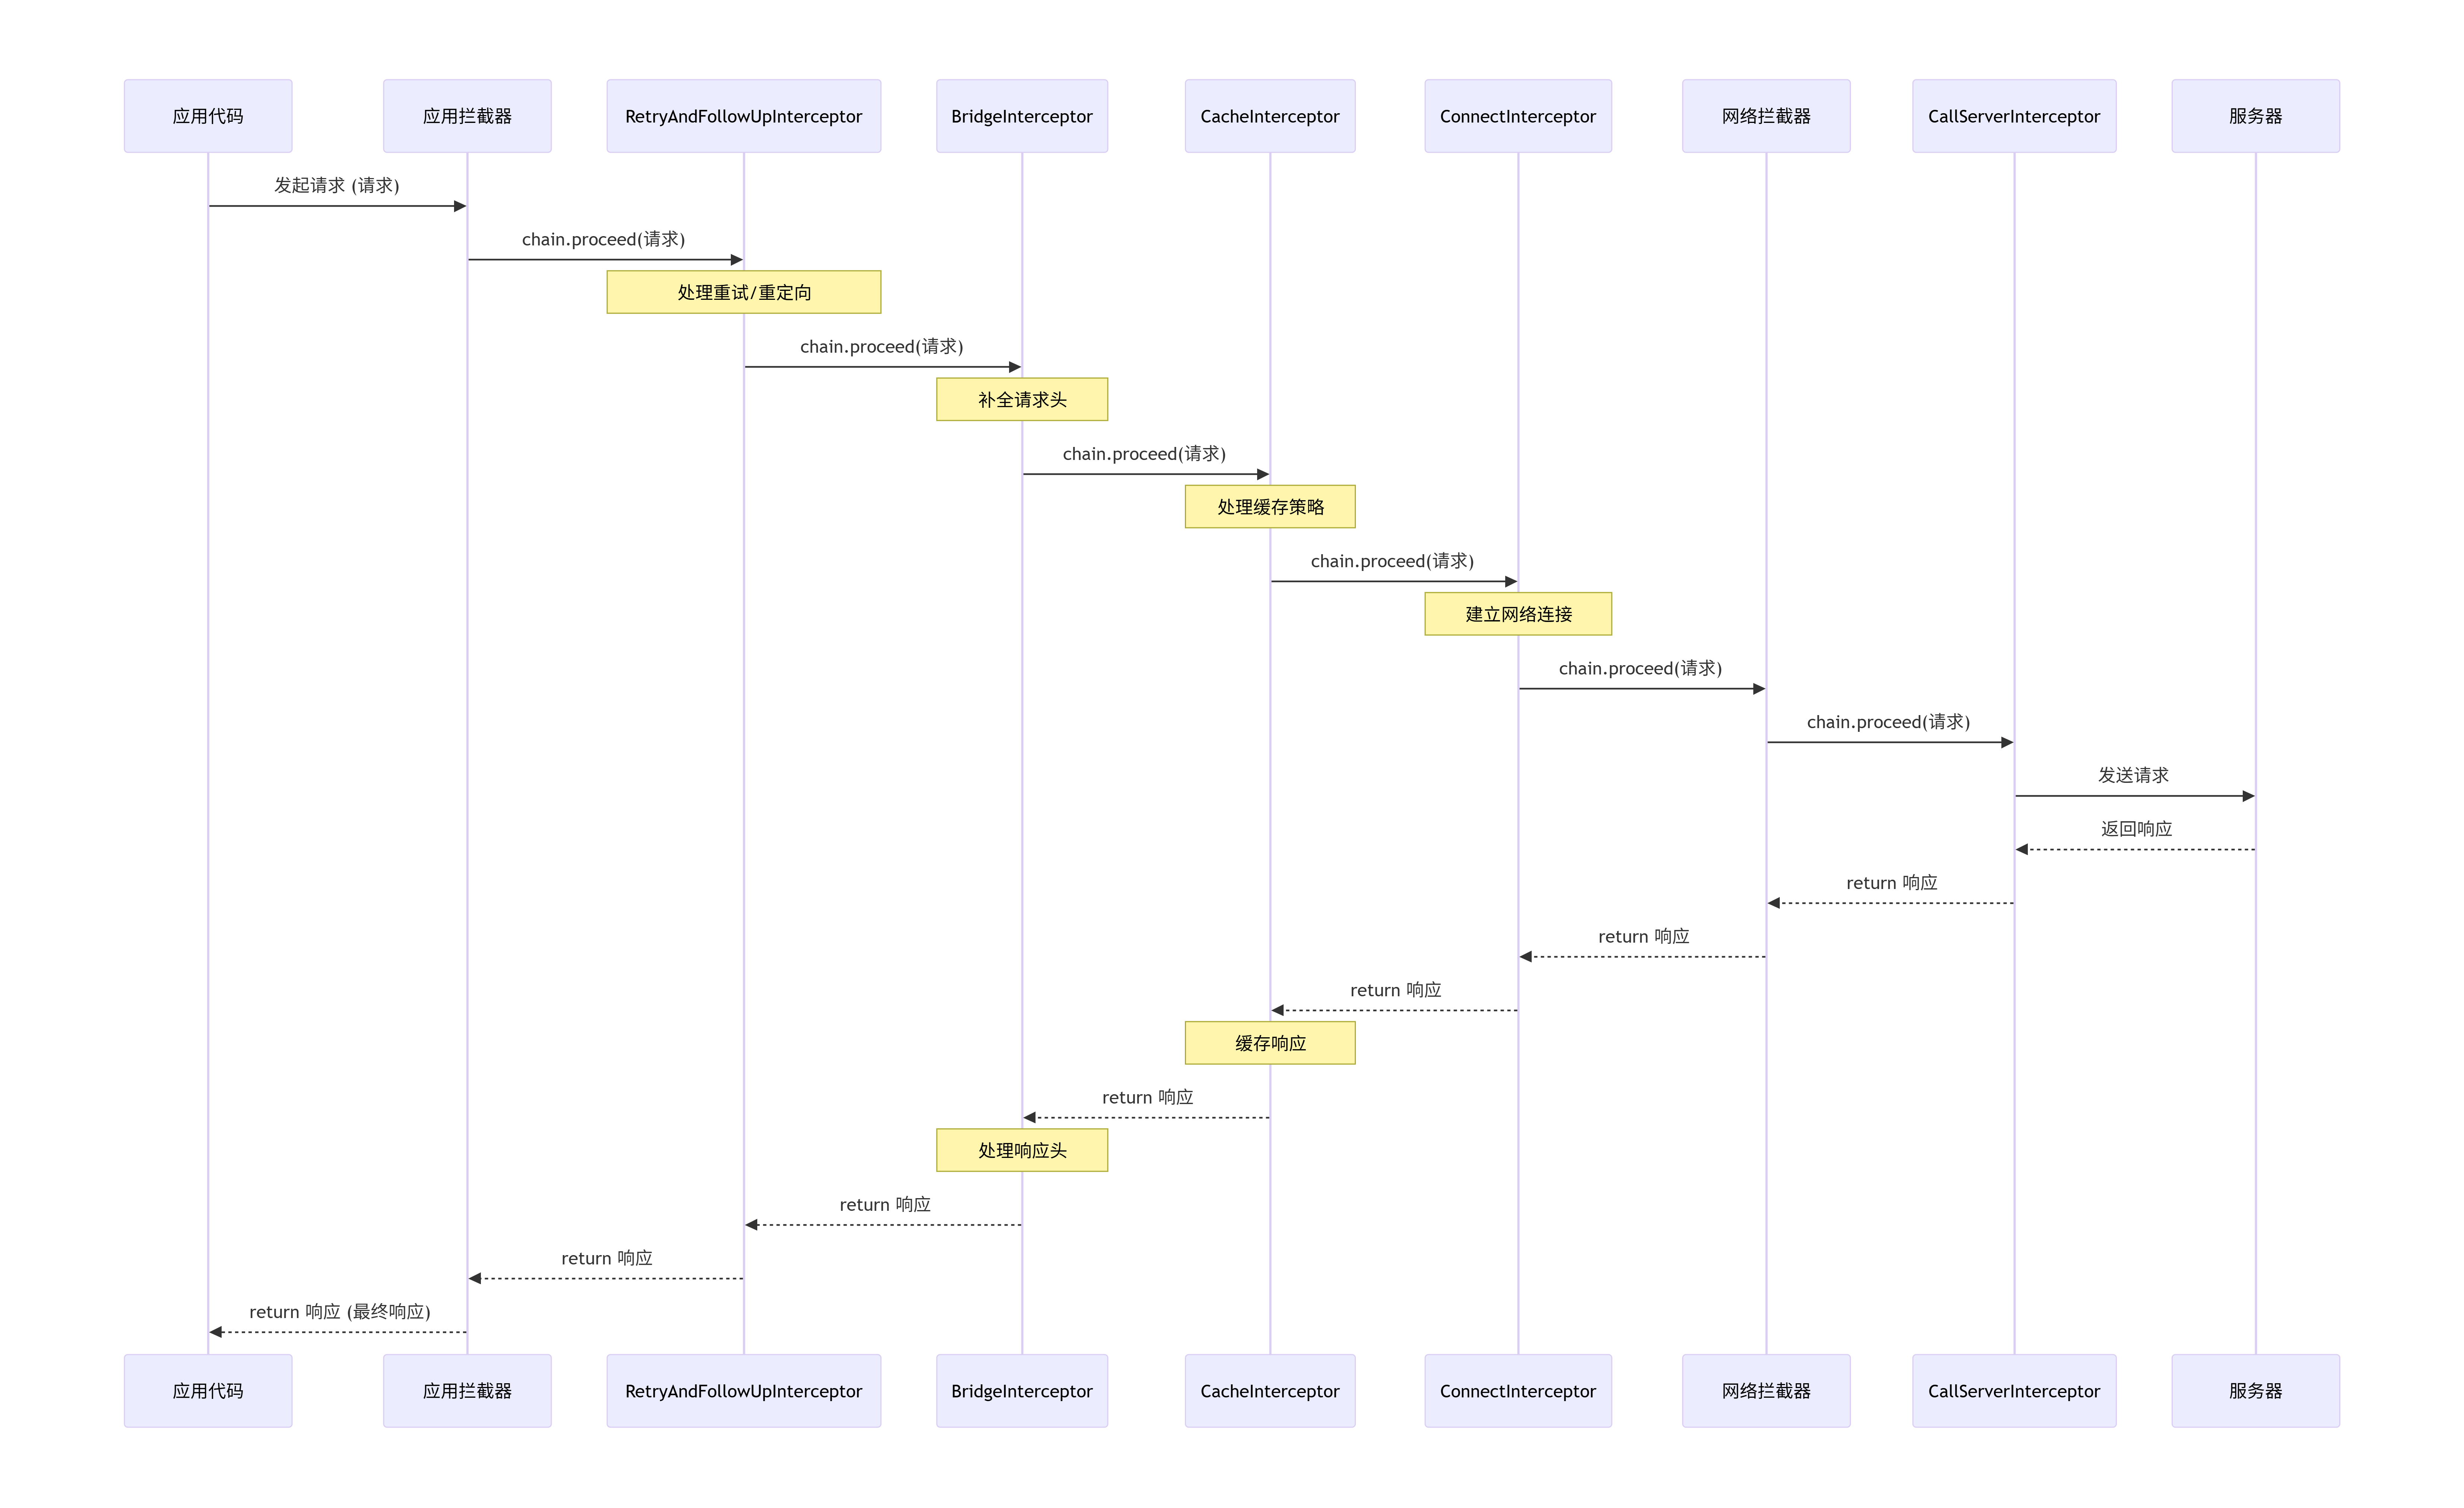
应用拦截器
应用拦截器可以添加多个,先添加的拦截器先处理请求,但最后处理响应。对于输出日志、统一添加Header等不关心网络中间过程的场景,优先使用应用拦截器,对于需要观察网络重定向、处理响应压缩等场景,考虑使用网络拦截器
如下拦截器,用于在请求发送之前添加统一的请求头
1
2
3
4
5
6
7
8
9
10
11
12
13
14
15
16
17
18
| public class HeaderInterceptor implements Interceptor {
@NonNull
@Override
public Response intercept(@NonNull Chain chain) throws IOException {
Request originalRequest = chain.request();
Request newRequest = originalRequest.newBuilder()
.header("Authorization", "test authorization")
.addHeader("Custom-Header", "test custom header")
.build();
return chain.proceed(newRequest);
}
}
|
如下拦截器,用于记录请求耗时和输出响应体内容
ResponseBody的数据流只能被消费一次,若需多次读取,可用response.peekBody()获取一个副本
1
2
3
4
5
6
7
8
9
10
11
12
13
14
15
16
17
18
19
20
21
22
23
24
25
26
27
| public class LoggingInterceptor implements Interceptor {
private static final String TAG = LoggingInterceptor.class.getSimpleName();
@NonNull
@Override
public Response intercept(@NonNull Chain chain) throws IOException {
Request request = chain.request();
long startTime = System.nanoTime();
Response response = chain.proceed(request);
long totalMs = TimeUnit.NANOSECONDS.toMillis(System.nanoTime() - startTime);
LogUtil.d(TAG, "请求耗时: " + totalMs);
ResponseBody peekBody = response.peekBody(Long.MAX_VALUE);
LogUtil.d(TAG, "Body: " + peekBody.string());
return response;
}
}
|
添加拦截器到OkHttpClient中
1
2
3
4
| OkHttpClient okHttpClient = new OkHttpClient.Builder()
.addInterceptor(new HeaderInterceptor())
.addInterceptor(new LoggingIntercepter())
.build();
|
网络拦截器
网络拦截器也可以添加多个,先添加的拦截器先处理请求,但最后处理响应。网络拦截器在请求发送到网络之前和响应接收之后被调用,因此可以用于观察网络重定向、处理响应压缩等场景
如下代码,可以观察网络重定向
1
2
3
4
5
6
7
8
9
10
11
12
13
14
15
16
17
18
19
20
21
22
23
|
public class NetworkMonitorInterceptor implements Interceptor {
private static final String TAG = NetworkMonitorInterceptor.class.getSimpleName();
@NonNull
@Override
public Response intercept(@NonNull Chain chain) throws IOException {
Request request = chain.request();
LogUtil.d(TAG, "Network Interceptor URL: " + request.url());
Response response = chain.proceed(request);
LogUtil.d(TAG, "Response Code: " + response.code());
return response;
}
}
|
添加网络拦截器到OkHttpClient中
1
2
3
| OkHttpClient okHttpClient = new OkHttpClient.Builder()
.addNetworkInterceptor(new NetworkMonitorInterceptor())
.build();
|
事件监听器
EventListener在不修改业务代码的情况下,精确监听网络请求的完整生命周期,通过各个阶段的事件回调,精确地测量DNS解析、TCP连接、TLS握手等环节的耗时
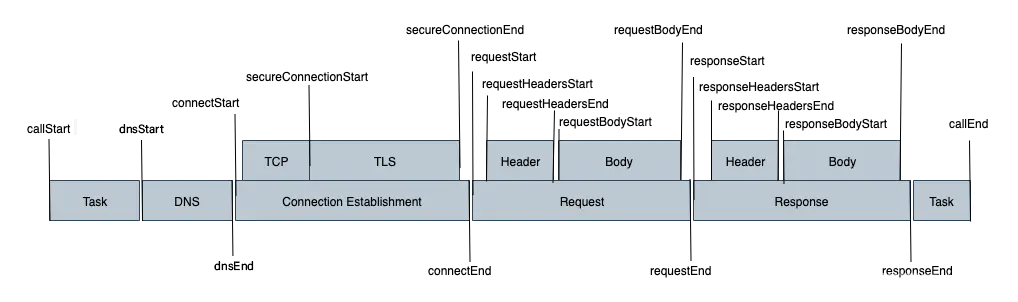
如下代码,是对一些连接状态的监听
1
2
3
4
5
6
7
8
9
10
11
12
13
14
15
16
17
18
19
20
21
22
23
24
25
26
27
28
29
30
31
32
33
34
35
36
37
38
39
40
41
42
43
44
45
46
47
48
49
50
51
52
53
54
55
56
| public class TimingEventListener extends EventListener {
private static final String TAG = TimingEventListener.class.getSimpleName();
private long callStartTime;
private long dnsStartTime;
private long connectStartTime;
private long responseStartTime;
@Override
public void callStart(@NonNull Call call) {
super.callStart(call);
callStartTime = System.nanoTime();
}
@Override
public void callEnd(@NonNull Call call) {
super.callEnd(call);
LogUtil.d(TAG, "总耗时: " + TimeUnit.NANOSECONDS.toMillis(System.nanoTime() - callStartTime));
}
@Override
public void dnsStart(@NonNull Call call, @NonNull String domainName) {
super.dnsStart(call, domainName);
dnsStartTime = System.nanoTime();
}
@Override
public void dnsEnd(@NonNull Call call, @NonNull String domainName, @NonNull List<InetAddress> inetAddressList) {
super.dnsEnd(call, domainName, inetAddressList);
LogUtil.d(TAG, "dns耗时: " + TimeUnit.NANOSECONDS.toMillis(System.nanoTime() - dnsStartTime));
}
@Override
public void connectStart(@NonNull Call call, @NonNull InetSocketAddress inetSocketAddress, @NonNull Proxy proxy) {
super.connectStart(call, inetSocketAddress, proxy);
connectStartTime = System.nanoTime();
}
@Override
public void connectEnd(@NonNull Call call, @NonNull InetSocketAddress inetSocketAddress, @NonNull Proxy proxy, @Nullable Protocol protocol) {
super.connectEnd(call, inetSocketAddress, proxy, protocol);
LogUtil.d(TAG, "连接耗时: " + TimeUnit.NANOSECONDS.toMillis(System.nanoTime() - connectStartTime));
}
@Override
public void connectionAcquired(@NonNull Call call, @NonNull Connection connection) {
super.connectionAcquired(call, connection);
responseStartTime = System.nanoTime();
}
@Override
public void connectionReleased(@NonNull Call call, @NonNull Connection connection) {
super.connectionReleased(call, connection);
LogUtil.d(TAG, "请求耗时: " + TimeUnit.NANOSECONDS.toMillis(System.nanoTime() - responseStartTime));
}
}
|
添加事件监听器到OkHttpClient中,有如下两种方法
1
2
3
4
5
6
7
8
9
10
11
12
13
14
15
|
OkHttpClient okHttpClient = new OkHttpClient.Builder()
.eventListenerFactory(new EventListener.Factory() {
@NonNull
@Override
public EventListener create(@NonNull Call call) {
return new TimingEventListener();
}
})
.build();
OkHttpClient okHttpClient = new OkHttpClient.Builder()
.eventListener(new TimingEventListener())
.build();
|
文件下载
基本文件下载
对Response对象执行如下操作,即可实现文件下载,将文件内容写入到本地文件中
1
2
3
4
5
6
7
8
9
10
11
12
13
14
15
16
| if (response.isSuccessful()) {
ResponseBody responseBody = response.body();
if (responseBody != null) {
try (InputStream inputStream = responseBody.byteStream();
FileOutputStream outputStream = new FileOutputStream(file)) {
byte[] buffer = new byte[4096];
int len;
while ((len = inputStream.read(buffer)) != -1) {
outputStream.write(buffer, 0, len);
}
}
}
} else {
LogUtil.d(TAG, "onResponse(): responseFail code=" + response.code());
}
response.close();
|
或者使用Okio库提供的BufferedSource和BufferedSink,实现文件下载,将文件内容写入到本地文件中
1
2
3
4
5
6
7
8
9
10
11
12
| if (response.isSuccessful()) {
ResponseBody responseBody = response.body();
if (responseBody != null) {
try (BufferedSource source = responseBody.source();
BufferedSink bufferedSink = Okio.buffer(Okio.sink(file))) {
source.readAll(bufferedSink);
}
}
} else {
LogUtil.d(TAG, "onResponse(): responseFail code=" + response.code());
}
response.close();
|
高级文件下载
理论部分
下面实现带进度监听的文件下载,如果要优雅的实现该功能,需要理解ResponseBody、ForwardingSource和BufferedSource
ResponseBody是OkHttp中的抽象类,代表HTTP响应的主体部分,它提供了一套按需读取的机制,该抽象类有3个核心抽象方法
contentType():返回响应体的媒体类型,如application/jsoncontentLength():返回响应体的总字节长度,以字节为单位,返回-1时表示长度未知source():核心,返回一个OkHttp提供的BufferedSource对象,通过这个对象从网络流中分块读取数据(Retrofit的@Streaming注解防止内存溢出的关键)
ForwardingSource是Okio库提供的抽象类,是实现进度监听的核心。ForwardingSource实现了Source接口,它采用装饰者模式,内部持有一个Source对象,通过ForwardingSource提供的read方法,在不影响原Source的情况下计算下载进度。其使用有以下注意事项
ForwardingSource的read方法在I/O线程中会被频繁调用,所以只适合做最轻量的工作,否则将严重影响下载速度read方法执行在I/O线程中,绝对不能更新UI,监听回调中也不能更新UI
BufferedSource是Okio库提供的接口,它继承自Source接口,在此基础上添加了缓冲功能。通过Okio.buffer(Source)方法可以创建BufferedSource对象
实现部分
先创建一个DownloadProgressResponseBody类,在其中实现下载进度计算、进度监听功能
1
2
3
4
5
6
7
8
9
10
11
12
13
14
15
16
17
18
19
20
21
22
23
24
25
26
27
28
29
30
31
32
33
34
35
36
37
38
39
40
41
42
43
44
45
46
47
48
49
50
51
52
53
54
55
56
57
58
59
60
61
62
63
64
65
66
67
68
69
70
| public class DownloadProgressResponseBody extends ResponseBody {
private BufferedSource bufferedSource;
private final ResponseBody delegateResponseBody;
private final ProgressListener progressListener;
public DownloadProgressResponseBody(ResponseBody delegateResponseBody, ProgressListener progressListener) {
this.delegateResponseBody = delegateResponseBody;
this.progressListener = progressListener;
}
@Override
public long contentLength() {
return delegateResponseBody.contentLength();
}
@Nullable
@Override
public MediaType contentType() {
return delegateResponseBody.contentType();
}
@NonNull
@Override
public BufferedSource source() {
if (bufferedSource == null) {
CountingSource countingSource = new CountingSource(delegateResponseBody.source());
bufferedSource = Okio.buffer(countingSource);
}
return bufferedSource;
}
private class CountingSource extends ForwardingSource {
long totalBytesRead = 0;
public CountingSource(@NonNull Source delegateSource) {
super(delegateSource);
}
@Override
public long read(@NonNull Buffer sink, long byteCount) throws IOException {
long bytesRead = super.read(sink, byteCount);
boolean done = (bytesRead == -1);
if (!done) {
totalBytesRead += bytesRead;
}
if (progressListener != null) {
progressListener.onProgress(totalBytesRead, contentLength(), done);
}
return bytesRead;
}
}
public interface ProgressListener {
void onProgress(long readBytes, long totalBytes, boolean isDone);
}
}
|
使用时,将原Response对象的响应体ResponseBody用DownloadProgressResponseBody包装
1
2
3
4
5
6
7
8
9
10
11
12
13
14
15
16
17
18
19
|
DownloadProgressResponseBody.ProgressListener progressListener = (bytesRead, totalBytes, isDone) -> {
LogUtil.d(TAG, "bytesRead=" + bytesRead + " totalBytes=" + totalBytes + " isDone=" + isDone);
};
if (response.isSuccessful()) {
ResponseBody responseBody = response.body();
if (responseBody != null) {
responseBody = new DownloadProgressResponseBody(responseBody, progressListener);
try (BufferedSource source = responseBody.source();
BufferedSink bufferedSink = Okio.buffer(Okio.sink(file))) {
source.readAll(bufferedSink);
}
}
} else {
LogUtil.d(TAG, "onResponse(): responseFail code=" + response.code());
}
response.close();
|
还有一种一劳永逸的办法,在拦截器中替换Response对象的响应体,把原来的响应体用DownloadProgressResponseBody包装,同时也把下载进度监听对象传入DownloadProgressResponseBody中
1
2
3
4
5
6
7
8
9
10
11
12
13
14
15
16
17
18
19
| public class DownloadProgressInterceptor implements Interceptor {
private final DownloadProgressResponseBody.ProgressListener progressListener;
public DownloadProgressInterceptor(DownloadProgressResponseBody.ProgressListener progressListener) {
this.progressListener = progressListener;
}
@NonNull
@Override
public Response intercept(@NonNull Chain chain) throws IOException {
Request request = chain.request();
Response response = chain.proceed(request);
return response.newBuilder()
.body(new DownloadProgressResponseBody(response.body(), progressListener))
.build();
}
}
|
使用时,先创建一个下载监听对象,然后给OkHttpClient添加下载拦截器,将下载监听对象传入拦截器中,再把拦截器添加到OkHttpClient
1
2
3
4
5
6
7
8
9
10
11
|
DownloadProgressResponseBody.ProgressListener progressListener = (bytesRead, totalBytes, isDone) -> {
LogUtil.d(TAG, "bytesRead=" + bytesRead + " totalBytes=" + totalBytes + " isDone=" + isDone);
};
OkHttpClient okHttpClient = new OkHttpClient.Builder()
.addNetworkInterceptor(new DownloadProgressInterceptor(progressListener))
.build();
Request.Builder builder = new Request.Builder();
Request request = builder.url("https://freetestdata.com/wp-content/uploads/2021/09/png-5mb-1.png")
.build();
|
经过以上步骤,执行下载文件下载时,会触发onProgress回调,输出下载进度
1
2
3
4
5
6
7
8
9
10
11
12
13
14
15
16
17
18
19
20
21
| Call call = okHttpClient.newCall(request);
call.enqueue(new Callback() {
@Override
public void onResponse(@NonNull Call call, @NonNull Response response) throws IOException {
if (response.isSuccessful()) {
ResponseBody responseBody = response.body();
if (responseBody != null) {
saveFile(responseBody);
}
} else {
LogUtil.d(TAG, "onResponse(): response code==" + response.code());
}
response.close();
}
@Override
public void onFailure(@NonNull Call call, @NonNull IOException e) {
LogUtil.d(TAG, "onFailure(): error==" + e.getMessage());
}
});
|
文件上传
基本文件上传
单文件上传
1
2
3
4
5
6
7
| File file = new File("/storage/emulated/0/test.txt");
RequestBody requestBody = RequestBody.create(file, MediaType.get("application/octet-stream"));
Request request = builder.url("https://www.httpbin.org/post")
.post(requestBody)
.build();
Call call = okHttpClient.newCall(request);
|
多文件上传
1
2
3
4
5
6
7
8
9
| MultipartBody multipartBody = new MultipartBody.Builder()
.addFormDataPart("file1", file1.getName(), requestBody1)
.addFormDataPart("file2", file2.getName(), requestBody2)
.build();
Request request = builder.url("https://www.httpbin.org/post")
.post(multipartBody)
.build();
Call call = okHttpClient.newCall(request);
|
高级文件上传
理论部分
下面实现带进度监听的文件上传,同样的,实现该功能,需要理解RequestBody、ForwardingSink和BufferedSink
RequestBody同样是OkHttp中的抽象类,代表HTTP请求的主体部分,其在概念上与ResponseBody形成对称关系,一个负责发送数据,另一个负责接收数据。RequestBody有如下3个核心抽象方法
contentType(): 返回请求体的媒体类型,如application/json,可以返回null,OkHttp会自动添加合适的Content-Type头contentLength(): 返回请求体的总字节长度,必须准确文件长度,如果返回-1(表示长度未知)可能导致某些服务器不兼容writeTo(BufferedSink sink): 核心写入方法,只能被调用一次,需要在这个方法里将数据流写入BufferedSink,writeTo内部的操作要尽可能轻量,否则会影响上传速度
ForwardingSink是Okio库提供的抽象类,它实现了Sink接口,采用装饰者模式,内部持有一个Sink对象,以供不修改原始Sink行为的情况下,通过重写write方法来注入额外逻辑,例如计算上传进度
ForwardingSink的write方法在I/O线程中会被频繁调用,所以只适合做最轻量的工作,否则将严重影响上传速度write方法执行在I/O线程中,绝对不能更新UI,监听回调中也不能更新UI
BufferedSink也是Okio库提供的接口,它继承自Sink接口,在此基础上内置一个缓冲区,先累积数据到内存,然后一次性批量写入底层Sink,因为Sink是底层的数据写出接口,每次write()都可能触发一次系统调用,所以BufferedSink可以提高写入效率。通过Okio.buffer(Sink)方法可以创建BufferedSink对象
实现部分
创建UploadProgressRequestBody类,在其中实现上传进度计算、进度监听功能
1
2
3
4
5
6
7
8
9
10
11
12
13
14
15
16
17
18
19
20
21
22
23
24
25
26
27
28
29
30
31
32
33
34
35
36
37
38
39
40
41
42
43
44
45
46
47
48
49
50
51
52
53
54
55
56
57
58
59
60
61
62
63
64
65
66
| public final class UploadProgressRequestBody extends RequestBody {
private final RequestBody delegateRequestBody;
private final ProgressListener progressListener;
public UploadProgressRequestBody(RequestBody delegateRequestBody, ProgressListener progressListener) {
this.delegateRequestBody = delegateRequestBody;
this.progressListener = progressListener;
}
@Override
public MediaType contentType() {
return delegateRequestBody.contentType();
}
@Override
public long contentLength() throws IOException {
return delegateRequestBody.contentLength();
}
@Override
public void writeTo(@NonNull BufferedSink sink) throws IOException {
CountingSink countingSink = new CountingSink(sink);
BufferedSink progressSink = Okio.buffer(countingSink);
delegateRequestBody.writeTo(progressSink);
progressSink.flush();
}
private class CountingSink extends ForwardingSink {
private long totalBytesWritten = 0;
private final long contentLength;
public CountingSink(BufferedSink delegate) throws IOException {
super(delegate);
this.contentLength = contentLength();
}
@Override
public void write(@NonNull Buffer source, long byteCount) throws IOException {
super.write(source, byteCount);
totalBytesWritten += byteCount;
boolean isDone = (totalBytesWritten == contentLength);
if (progressListener != null) {
progressListener.onProgress(totalBytesWritten, contentLength, isDone);
}
}
}
public interface ProgressListener {
void onProgress(long writtenBytes, long totalBytes, boolean isDone);
}
}
|
调用时,只需要将原始请求体包装在UploadProgressRequestBody中即可,如下所示
1
2
3
4
5
6
7
8
9
10
11
12
|
UploadProgressRequestBody.ProgressListener progressListener = (writtenBytes, totalBytes, isDone) -> {
LogUtil.d(TAG, "writtenBytes=" + writtenBytes + " totalBytes=" + totalBytes + " isDone=" + isDone);
};
RequestBody fileBody = RequestBody.create(file, MediaType.get("application/octet-stream"));
ProgressRequestBody progressRequestBody = new ProgressRequestBody(fileBody, progressListener);
Request request = builder.url("https://www.httpbin.org/post")
.post(progressRequestBody)
.build();
Call call = okHttpClient.newCall(request);
|
当然也可以通过拦截器来实现上传进度监听,实现一劳永逸,如下实现上传监听拦截器
1
2
3
4
5
6
7
8
9
10
11
12
13
14
15
16
17
18
19
20
21
22
23
24
| public class UploadProgressInterceptor implements Interceptor {
private final UploadProgressRequestBody.ProgressListener progressListener;
public UploadProgressInterceptor(UploadProgressRequestBody.ProgressListener progressListener) {
this.progressListener = progressListener;
}
@NonNull
@Override
public Response intercept(@NonNull Chain chain) throws IOException {
Request originalRequest = chain.request();
RequestBody originalRequestBody = originalRequest.body();
if (originalRequestBody != null) {
RequestBody progressRequestBody = new UploadProgressRequestBody(originalRequestBody, progressListener);
originalRequest = originalRequest.newBuilder()
.method(originalRequest.method(), progressRequestBody)
.build();
}
return chain.proceed(originalRequest);
}
}
|
注意与下载监听添加拦截器不同,对于上传进度监听,若使用addNetworkInterceptor,在某些场景如重定向时可能触发多次writeTo,导致进度回调重新开始,所以上传进度监听使用应用拦截器更稳定
1
2
3
4
5
6
7
8
9
10
11
12
13
14
|
UploadProgressRequestBody.ProgressListener progressListener = (writtenBytes, totalBytes, isDone) -> {
LogUtil.d(TAG, "writtenBytes=" + writtenBytes + " totalBytes=" + totalBytes + " isDone=" + isDone);
};
RequestBody fileBody = RequestBody.create(file, MediaType.get("application/octet-stream"));
OkHttpClient okHttpClient = new OkHttpClient.Builder()
.addInterceptor(new UploadProgressInterceptor(progressListener))
.build();
Request request = builder.url("https://www.httpbin.org/post")
.post(fileBody)
.build();
Call call = okHttpClient.newCall(request);
|
参考:
OkHttp拦截器
OkHttp事件监听器
Volley
请求器
Volley适合数据量小但请求频繁的场景,它把响应全部存在内存里,处理小块数据速度很快,但是也因此不适合上传、下载大文件
Volley发送请求需要创建一个RequestQueue请求器对象,该对象可以用一个单例类来管理,后续需要发送网络请求时,直接从单例类中获取RequestQueue对象即可,如下代码创建请求器对象
1
| RequestQueue requestQueue = Volley.newRequestQueue(ApplicationHolder.getInstance().getApplication());
|
发送get请求
使用StringRequest发送的请求,在请求成功的情况下,直接返回字符串结果,失败的情况下返回一个VolleyError对象
创建Volley的Request对象时,需要传入请求方法、请求地址、请求成功回调和失败的回调
1
2
3
4
5
6
7
8
9
10
11
12
13
14
15
16
17
18
|
String url = "https://www.httpbin.org/get";
StringRequest stringRequest = new StringRequest(Request.Method.GET, url,
new Response.Listener<String>() {
@Override
public void onResponse(String response) {
LogUtil.d(TAG, "response: " + response);
}
},
new Response.ErrorListener() {
@Override
public void onErrorResponse(VolleyError error) {
LogUtil.d(TAG, "error: " + error.getMessage());
}
});
requestQueue.add(stringRequest);
|
使用JsonObjectRequest发送的请求,在请求成功的情况下,返回一个JSONObject对象,失败则返回VolleyError对象
1
2
3
4
5
6
7
8
9
10
11
12
13
14
15
16
17
| String url = "https://www.httpbin.org/get";
JsonObjectRequest jsonObjectRequest = new JsonObjectRequest(Request.Method.GET, url, null,
new Response.Listener<JSONObject>() {
@Override
public void onResponse(JSONObject response) {
LogUtil.d(TAG, "response: " + response.toString());
}
},
new Response.ErrorListener() {
@Override
public void onErrorResponse(VolleyError error) {
LogUtil.d(TAG, "error: " + error.getMessage());
}
});
requestQueue.add(jsonObjectRequest);
|
添加请求头等信息,需要重写Request的方法,如下添加自定义header
1
2
3
4
5
6
7
8
9
10
11
12
13
14
15
16
17
18
19
20
21
| StringRequest stringRequest = new StringRequest(Request.Method.GET, url,
new Response.Listener<String>() {
@Override
public void onResponse(String response) {
LogUtil.d(TAG, "response: " + response);
}
},
new Response.ErrorListener() {
@Override
public void onErrorResponse(VolleyError error) {
LogUtil.d(TAG, "error: " + error.getMessage());
}
}) {
@Override
public Map<String, String> getHeaders() throws AuthFailureError {
Map<String, String> params = new HashMap<>();
params.put("Custom-Header", "xxin");
return params;
}
};
|
发送post请求
如果需要发送post请求,提交form表单,也需要重写Request中的方法
1
2
3
4
5
6
7
8
9
10
11
12
13
14
15
16
17
18
19
20
21
22
23
24
| String url = "https://www.httpbin.org/post";
StringRequest stringRequest = new StringRequest(Request.Method.POST, url,
new Response.Listener<String>() {
@Override
public void onResponse(String response) {
LogUtil.d(TAG, "response: " + response);
}
},
new Response.ErrorListener() {
@Override
public void onErrorResponse(VolleyError error) {
LogUtil.d(TAG, "error: " + error.getMessage());
}
}) {
@Nullable
@Override
protected Map<String, String> getParams() throws AuthFailureError {
Map<String, String> params = new HashMap<>();
params.put("username", "admin");
params.put("password", "123456");
return params;
}
};
|
提交json数据有两种方法,如果使用StringRequest对象,则必须重写getBody()和getHeaders(),在getHeaders()指定Content-Type为application/json; charset=utf-8,否则提交的json数据将被form表单中的一个key
故此可知,Volley提交的数据最后通过getBody()上传,而类型都通过getHeaders()指定,好麻烦啊
1
2
3
4
5
6
7
8
9
10
11
12
13
14
15
16
17
18
19
20
21
22
23
24
25
26
27
28
| String url = "https://www.httpbin.org/post";
StringRequest stringRequest = new StringRequest(Request.Method.POST, url,
new Response.Listener<String>() {
@Override
public void onResponse(String response) {
LogUtil.d(TAG, "response: " + response);
}
},
new Response.ErrorListener() {
@Override
public void onErrorResponse(VolleyError error) {
LogUtil.d(TAG, "error: " + error.getMessage());
}
}) {
@Override
public byte[] getBody() throws AuthFailureError {
String json = "{ \"email\": \"x@xxin.xyz\", \"password\": \"123456\"}";
return json.getBytes();
}
@Override
public Map<String, String> getHeaders() throws AuthFailureError {
Map<String, String> headers = new HashMap<>();
headers.put("Content-Type", "application/json; charset=utf-8");
return headers;
}
};
|
如果使用JsonObjectRequest对象,需要将json数据转换为JSONObject对象
1
2
3
4
5
6
7
8
9
10
11
12
13
14
15
16
17
18
19
20
21
22
| String url = "https://www.httpbin.org/post";
String json = "{ \"email\": \"x@xxin.xyz\", \"password\": \"123456\"}";
JSONObject jsonObject;
try {
jsonObject = new JSONObject(json);
} catch (JSONException e) {
throw new RuntimeException(e);
}
JsonObjectRequest jsonObjectRequest = new JsonObjectRequest(Request.Method.POST, url, jsonObject,
new Response.Listener<JSONObject>() {
@Override
public void onResponse(JSONObject response) {
LogUtil.d(TAG, "response: " + response);
}
},
new Response.ErrorListener() {
@Override
public void onErrorResponse(VolleyError error) {
LogUtil.d(TAG, "error: " + error.getMessage());
}
});
requestQueue.add(jsonObjectRequest);
|
加载图片
Volley加载图片,好处是请求结果拿到后,不用手动切到主线程,直接就可以加载到ImageView上
1
2
3
4
5
6
7
8
9
10
11
12
13
14
15
| String imgUrl = "https://www.httpbin.org/image";
ImageRequest imageRequest = new ImageRequest(imgUrl,
new Response.Listener<Bitmap>() {
@Override
public void onResponse(Bitmap response) {
binding.image.setImageBitmap(response);
}
}, 0, 0, ImageView.ScaleType.CENTER_CROP, Bitmap.Config.RGB_565,
new Response.ErrorListener() {
@Override
public void onErrorResponse(VolleyError error) {
LogUtil.d(TAG, "error: " + error.getMessage());
}
});
requestQueue.add(imageRequest);
|
Retrofit
请求器
Retrofit本身不执行网络请求,只负责封装请求和解析结果,真正的网络通信由OkHttp负责。发送请求前,先创建Retrofit请求器对象,如下代码,其中
baseUrl为接口的基础地址,必须以/结尾,后续发送请求添加的路径会拼接在基础地址后面addConverterFactory为添加json解析器,此处添加Gson作为解析器,用于将json数据转换为Java对象
1
2
3
4
| Retrofit retrofit = new Retrofit.Builder()
.baseUrl("https://m1.apifoxmock.com/m1/8092681-7849123-default/")
.addConverterFactory(GsonConverterFactory.create())
.build();
|
发送get请求
首先根据接口返回的json数据,创建一个用于解析结果的类,假设创建了GetResponseBean类,然后创建接口并添加用于发送get请求的函数,如下代码
1
2
3
4
5
| public interface RequestTestService {
@GET("get/common")
Call<GetResponseBean> getTest();
}
|
通过Retrofit创建RequestTestService接口的对象
1
| RequestTestService requestTestService = retrofit.create(RequestTestService.class);
|
然后调用getTest()方法,将会返回一个用于发送请求的Call对象,用法和OkHttp的Call对象差不多,call.execute()发送同步请求,call.enqueue()发送异步请求
1
2
3
4
5
6
7
8
9
10
11
| Call<GetResponseBean> call = requestTestService.getTest();
Response<GetResponseBean> response = call.execute();
call.enqueue(new Callback<>() {
@Override
public void onResponse(Call<GetResponseBean> call, Response<GetResponseBean> response) { }
@Override
public void onFailure(Call<GetResponseBean> call, Throwable t) { }
});
|
发送post请求
根据要发送的json,创建对应Bean类,假设此处创建了LoginRequestBean类,然后根据接口返回的json创建LoginResponseBean类,接着创建创建接口,在接口中添加用于发送post请求的函数,如下代码
1
2
3
4
| public interface RequestTestService {
@POST("post/login")
Call<LoginResponseBean> login(@Body LoginRequestBean loginRequestBean);
}
|
通过如下代码,拿到call对象,然后调用call.execute()发送同步请求,call.enqueue()发送异步请求
1
2
3
4
| RequestTestService requestTestService = retrofit.create(RequestTestService.class);
LoginRequestBean loginRequestBean = new LoginRequestBean("x@xxin.xyz", "123456");
Call<LoginResponseBean> call = requestTestService.login(loginRequestBean);
|
自定义请求器
Retrofit基于OkHttp,所以可以自定义OkHttp的请求器
1
2
3
4
5
6
7
8
| OkHttpClient okHttpClient = new OkHttpClient.Builder()
.build();
Retrofit retrofit = new Retrofit.Builder()
.baseUrl("https://m1.apifoxmock.com/m1/8092681-7849123-default/")
.addConverterFactory(GsonConverterFactory.create())
.client(okHttpClient)
.build();
|
文件下载
在Retrofit中文件下载方法通常标注@Streaming注解,并且使用Call<ResponseBody>作为返回值
@Streaming注解是预防内存溢出的关键,用于指示框架不要将整个响应体加载到内存,而是以流式方式逐步读取
1
2
3
4
5
| public interface RequestTestService {
@GET("/image")
@Streaming
Call<ResponseBody> downloadFile();
}
|
剩下的操作和OkHttp下载文件一样,拿到ResponseBody对象后,调用responseBody.byteStream()方法获取输入流,然后把输入流写入文件即可
1
2
3
| RequestTestService requestTestService = retrofit.create(RequestTestService.class);
Call<ResponseBody> responseBodyCall = requestTestService.downloadFile();
|
文件上传
单个文件上传
在Retrofit中文件上传方法标注@Multipart注解,告诉Retrofit使用multipart/form-data编码,方法每个Part参数都需要标注@Part注解
@Multipart必须和@POST或@PUT搭配使用,不能和@FormUrlEncoded同时使用
1
2
3
4
5
| public interface RequestTestService {
@POST("post")
@Multipart
Call<ResponseBody> uploadFile(@Part MultipartBody.Part file);
}
|
Retrofit上传文件时,必须把文件封装成MultipartBody.Part对象,创建方法如下
1
2
3
4
| RequestBody requestBody = RequestBody.create(file, MediaType.get("application/octet-stream"));
MultipartBody.Part part = MultipartBody.Part.createFormData("file", file.getName(), requestBody);
Call<ResponseBody> responseBodyCall = requestTestService.uploadFile(part);
|
多个文件上传
固定文件数量
如果需要上传多个文件,可以在接口方法中添加多个@Part参数
1
2
3
4
5
| public interface RequestTestService {
@POST("post")
@Multipart
Call<ResponseBody> uploadFiles(@Part MultipartBody.Part file1, @Part MultipartBody.Part file2);
}
|
在调用uploadFiles()方法时,需要创建多个MultipartBody.Part对象,如下代码
1
2
3
4
5
6
7
| RequestBody requestBody1 = RequestBody.create(file1, MediaType.get("application/octet-stream"));
MultipartBody.Part part1 = MultipartBody.Part.createFormData("file1", file1.getName(), requestBody1);
RequestBody requestBody2 = RequestBody.create(file2, MediaType.get("application/octet-stream"));
MultipartBody.Part part2 = MultipartBody.Part.createFormData("file2", file2.getName(), requestBody2);
Call<ResponseBody> responseBodyCall = requestTestService.uploadFiles(part1, part2);
|
动态文件数量
把所有待上传的MultipartBody.Part对象封装成List中,然后在接口方法中使用@Part List<MultipartBody.Part>参数
1
2
3
| @Multipart
@POST("upload/multiple")
Call<ResponseBody> uploadMultipleFiles(@Part List<MultipartBody.Part> files);
|
注解指南
请求方法注解
| 注解 | 描述 | 示例 |
|---|
| @GET | GET 请求(获取数据) | @GET(“users/list”) |
| @POST | POST 请求(提交数据) | @POST(“users/new”) |
| @PUT | PUT 请求(更新完整资源) | @PUT(“users/{id}”) |
| @DELETE | DELETE 请求(删除资源) | @DELETE(“users/{id}”) |
| @PATCH | PATCH 请求(部分更新) | @PATCH(“users/{id}”) |
| @HEAD | 只获取响应头 | @HEAD(“users/list”) |
| @OPTIONS | 获取服务器支持的 HTTP 方法 | @OPTIONS(“users”) |
| @HTTP | 自定义 HTTP 方法 | @HTTP(method = “SEARCH”, path = “search”) |
参数注解
@Path
@Path用于替换URL路径中的占位符
如下代码,调用getRepo("repo-name")方法,将会返回baseUrl/users/repo-name路径的响应
1
2
| @GET("users/{repo}")
Call<Repo> getRepo(@Path("repo") String repoName);
|
@Query
@Query用于添加URL查询参数
如下代码,调用searchRepos("stars")方法,将会返回baseUrl/search/repositories?sort=stars路径的响应
1
2
| @GET("search/repositories")
Call<SearchResult> searchRepos(@Query("sort") String sort);
|
@QueryMap
@QueryMap用于添加多个URL查询参数
1
2
| @GET("search/repositories")
Call<SearchResult> searchRepos(@QueryMap Map<String, String> options);
|
通过如下Map对象,调用时service.searchRepos(hashMap)方法,将会返回baseUrl/search/repositories?sort=stars路径的响应
1
2
| Map<String, String> hashMap = new HashMap<>();
hashMap.put("sort", "stars");
|
@Field
@Field用于添加表单数据,必须配合@FormUrlEncoded注解使用,如下代码,调用login("username", "password")方法,会将username和password作为表单数据发送
1
2
3
| @FormUrlEncoded
@POST("user/login")
Call<LoginResponse> login(@Field("username") String username, @Field("password") String password);
|
@FieldMap
@FieldMap用于添加多个表单数据,也必须配合@FormUrlEncoded注解使用
1
2
3
| @FormUrlEncoded
@POST("user/update")
Call<User> updateUser(@FieldMap Map<String, String> fields);
|
通过如下Map对象,调用updateUser(hashMap)方法,会将hashMap中的键值对作为表单数据发送
1
2
3
| Map<String, String> hashMap = new HashMap<>();
hashMap.put("username", "username");
hashMap.put("password", "password");
|
@Body
@Body用于提交json格式的请求体,必须配合@POST注解使用,如下代码,调用createUser(user)方法,会将user对象转换为json数据发送
1
2
| @POST("users/new")
Call<User> createUser(@Body User user);
|
@Part
@Part用于添加multipart/form-data格式的请求体,必须配合@Multipart注解使用,如下代码,调用uploadFile(file)方法,会将file作为文件数据发送
1
2
3
| @Multipart
@POST("file/upload")
Call<UploadResponse> uploadFile(@Part MultipartBody.Part file);
|
@Header用于添加请求头,如下代码,调用getUserInfo("token")方法,会将Authorization: token作为请求头发送
1
2
| @GET("user/info")
Call<User> getUserInfo(@Header("Authorization") String token);
|
@Headers添加多个固定请求头,如下代码,调用getUsers()方法,会将Accept: application/json和User-Agent: MyApp/1.0作为请求头发送
1
2
3
4
5
6
| @Headers({
"Accept: application/json",
"User-Agent: MyApp/1.0"
})
@GET("users/list")
Call<List<User>> getUsers();
|
@HeaderMap添加多个动态请求头,如下代码,调用getUserInfo(hashMap)方法,会将hashMap中的键值对作为请求头发送
1
2
| @GET("user/info")
Call<User> getUserInfo(@HeaderMap Map<String, String> headers);
|
@Url
@Url定义的URL,不包含baseUrl,如下代码直接向fullUrl发送请求
1
2
| @GET
Call<ResponseBody> getDynamicUrl(@Url String fullUrl);
|