Android 统一接入
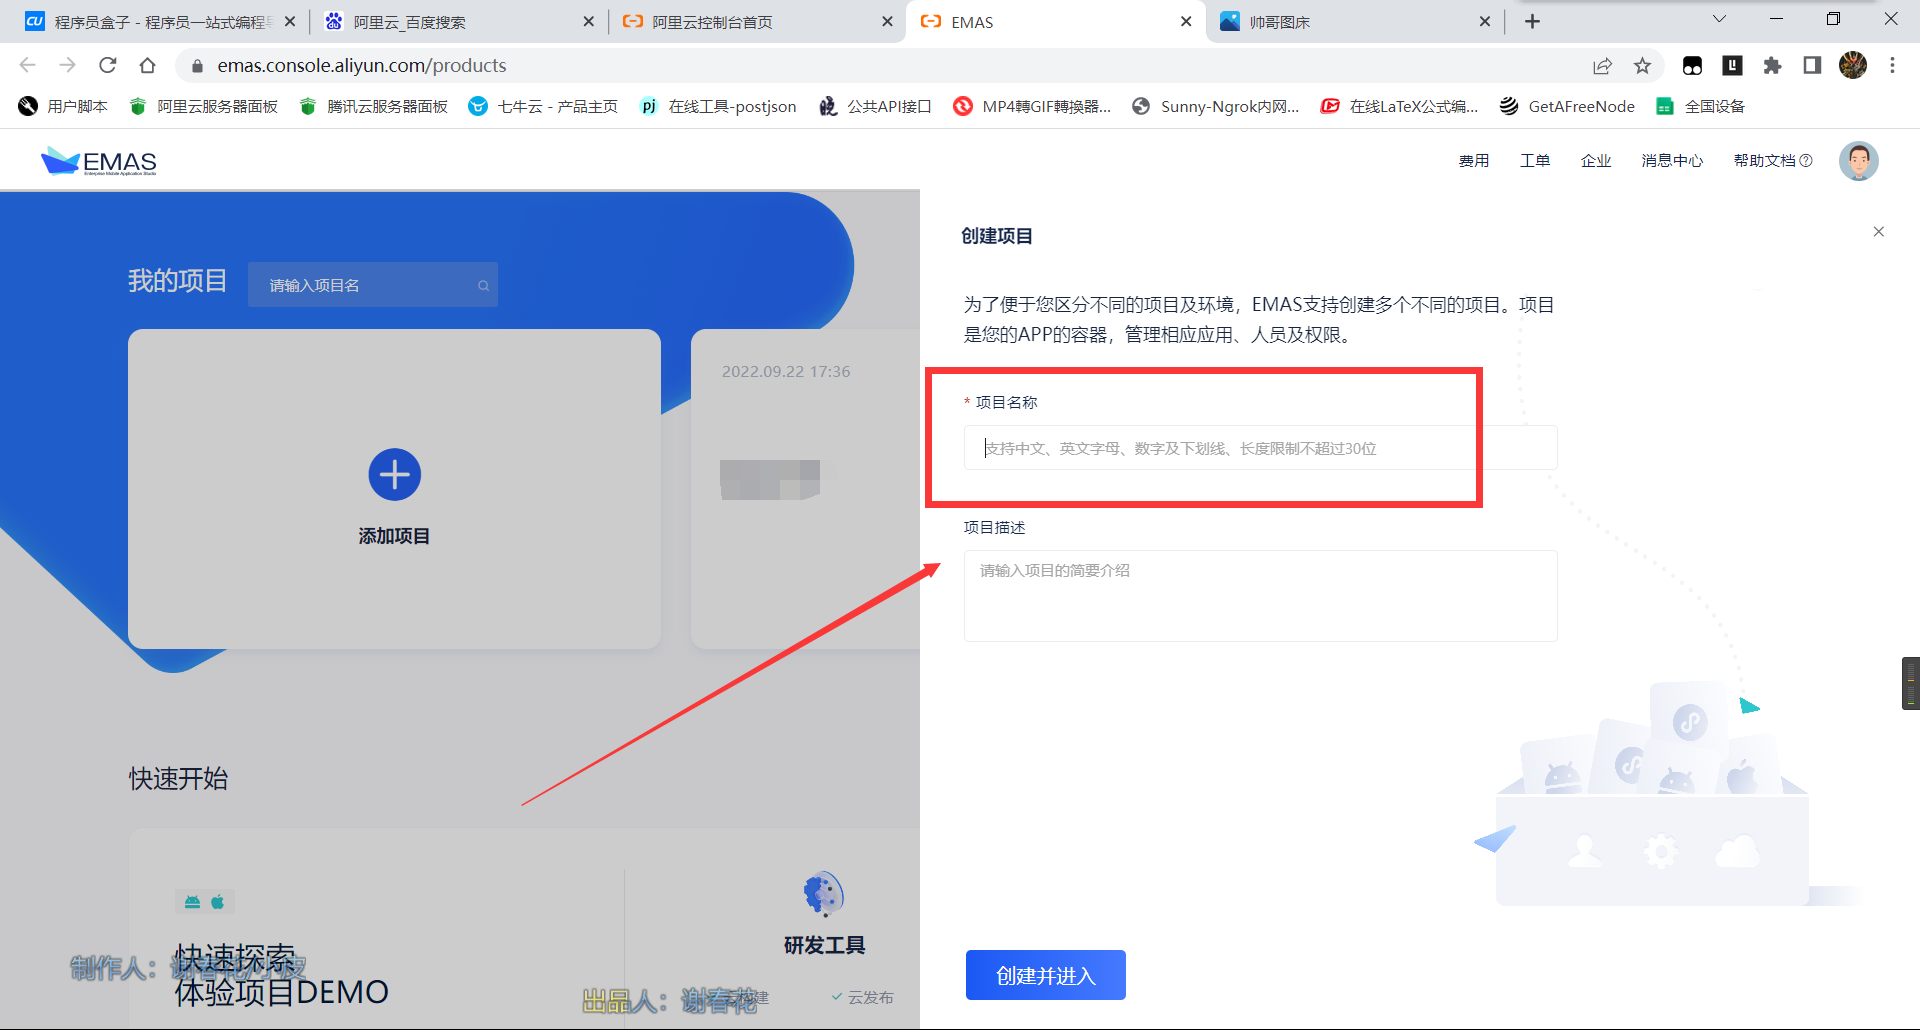
打开阿里云EMAS新建一个项目,填入项目名
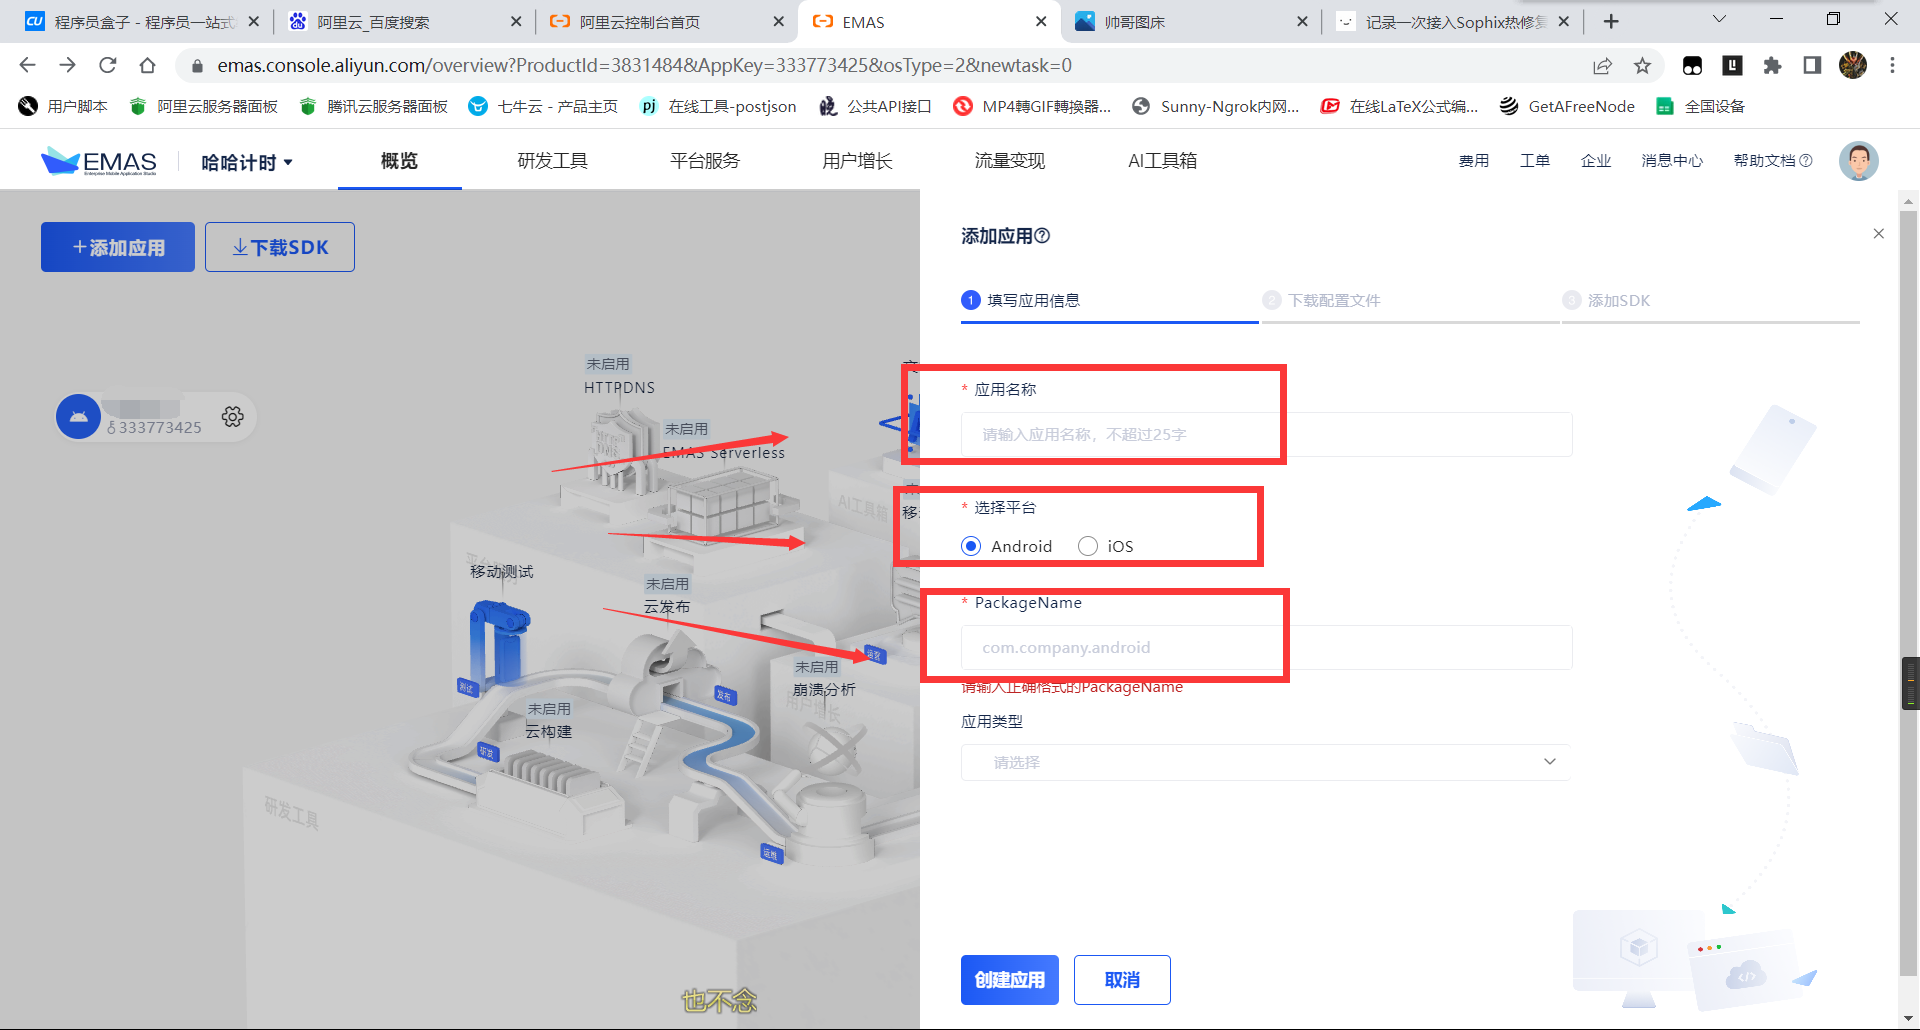
点击添加应用,添加一个新应用,填入应用信息
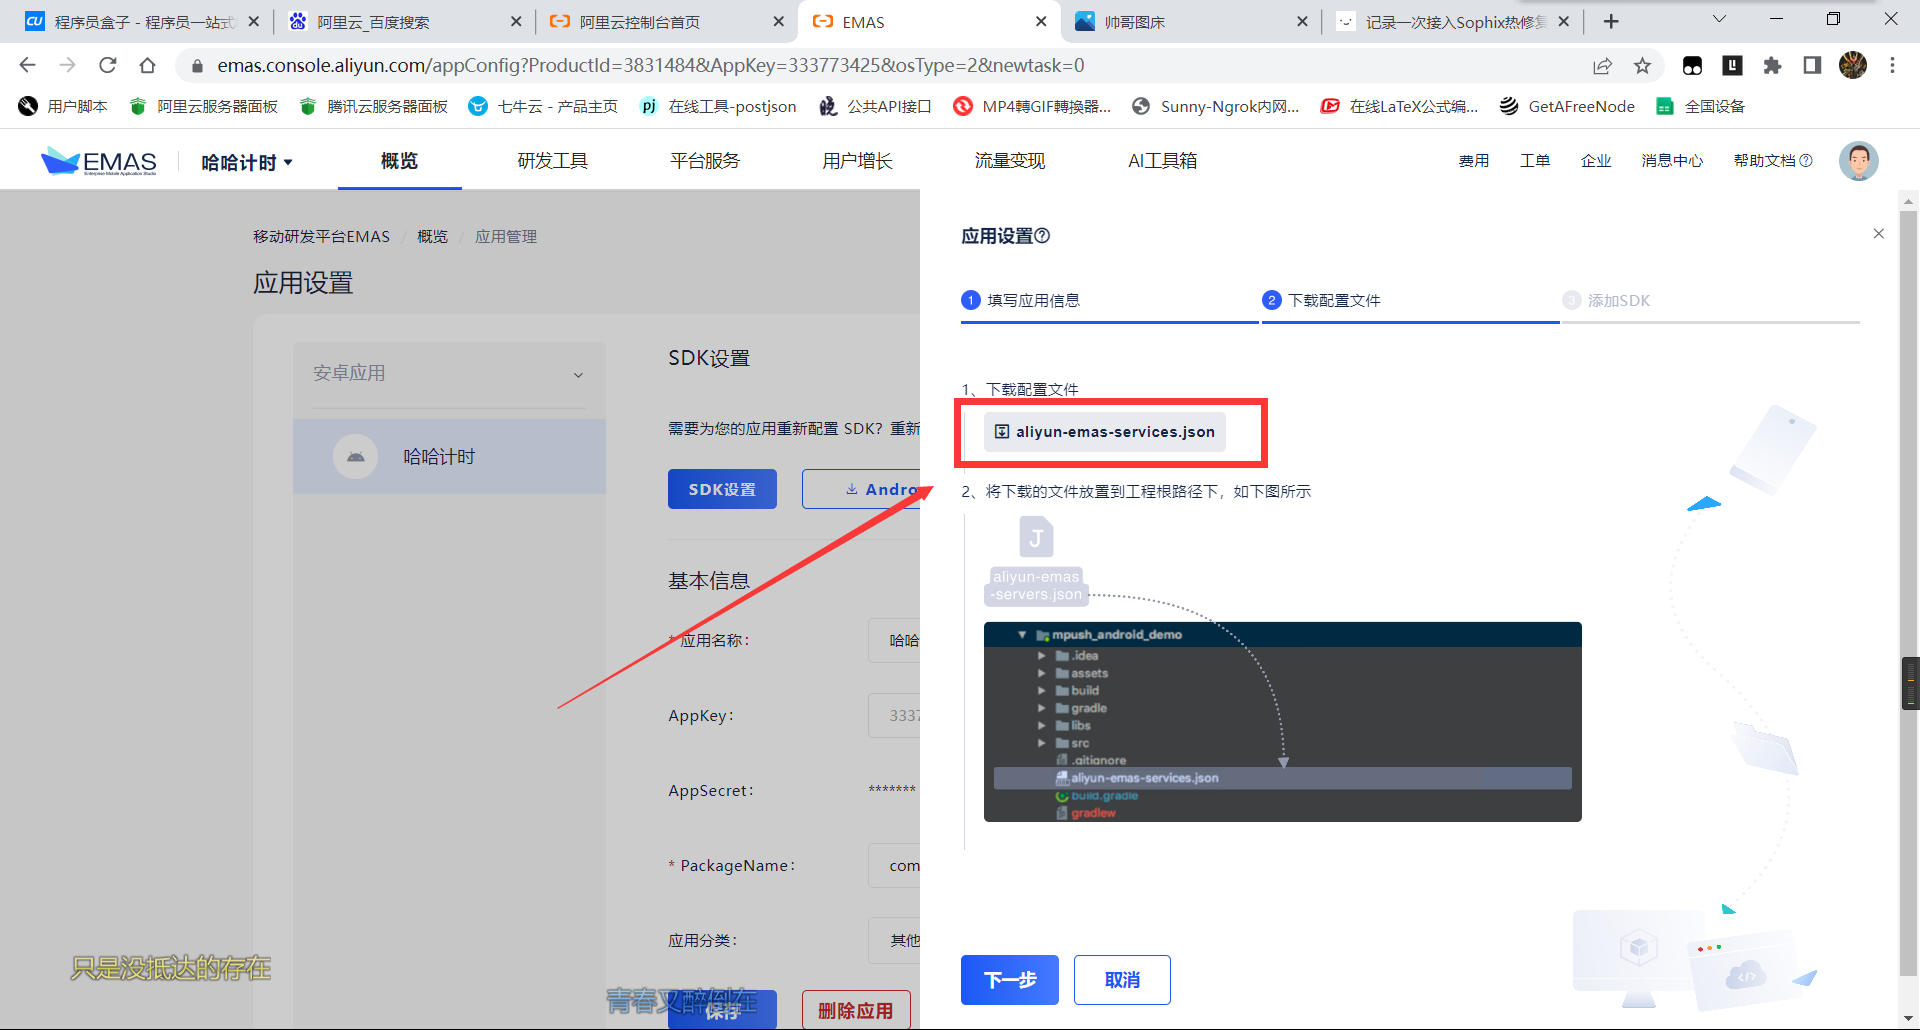
填写完毕之后点击下一步,下载这个配置文件
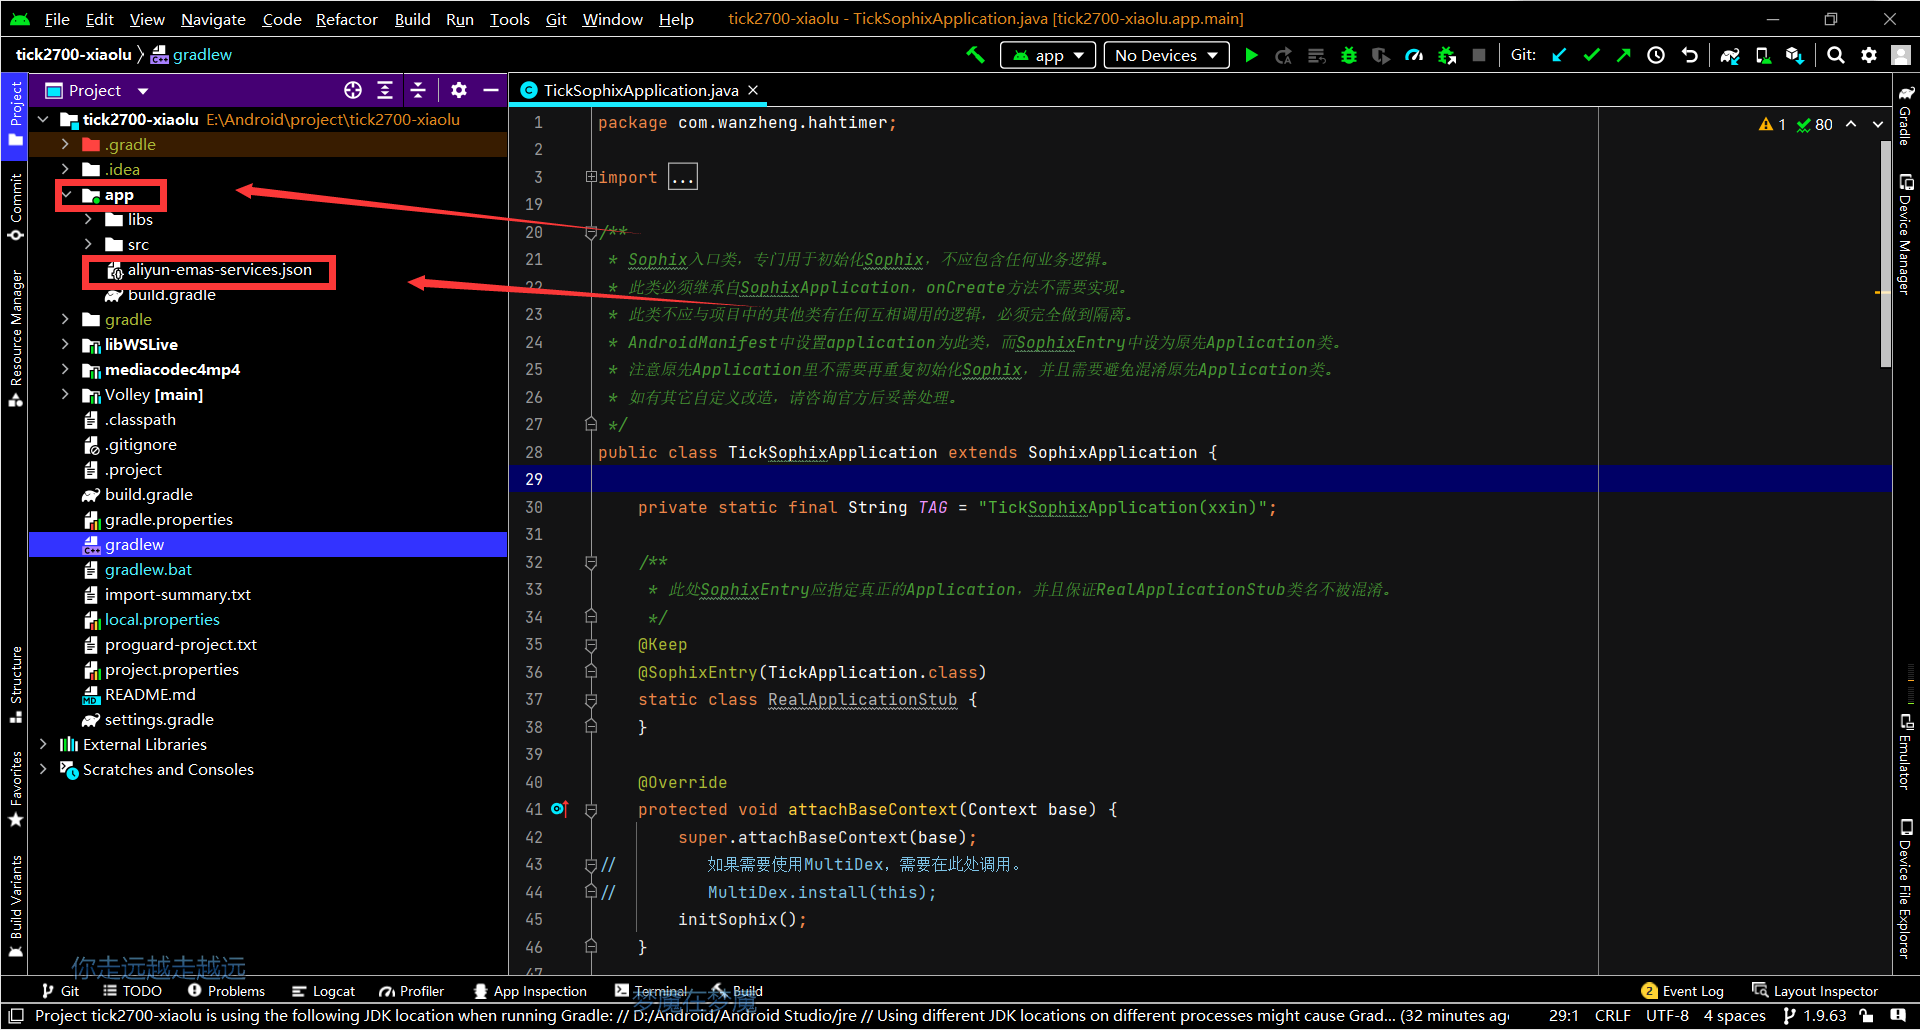
这里可能因为Android Studio版本的问题,我将配置文件放置于根目录之后报错了,移动到项目根目录的app目录下解决了问题
这里因为我们只需要热修复,所以在配置文件中关掉其他功能选项,需要仔细注意配置文件中hotfix_service的version,添加热修复依赖时要确保版本一致
1
2
3
4
5
6
7
8
9
10
11
12
13
14
15
16
17
18
19
20
21
22
23
24
25
26
27
28
29
30
31
32
33
34
35
36
37
38
39
40
41
42
43
44
45
46
47
48
49
| {
"config": {
"emas.appKey":"appKey",
"emas.appSecret":"appSecret",
"emas.packageName":"packageName",
"hotfix.idSecret":"idSecret",
"hotfix.rsaSecret":"rsaSecret",
"httpdns.accountId":"accountId",
"httpdns.secretKey":"secretKey",
"appmonitor.tlog.rsaSecret":"rsaSecret",
"appmonitor.rsaSecret":"rsaSecret"
},
"services": {
"hotfix_service":{
"status":1,
"version":"3.3.8"
},
"ha-adapter_service":{
"status":0,
"version":"1.1.5.3-open"
},
"feedback_service":{
"status":0,
"version":"3.3.9"
},
"tlog_service":{
"status":0,
"version":"1.1.4.4-open"
},
"httpdns_service":{
"status":0,
"version":"2.3.0-intl"
},
"apm_service":{
"status":0,
"version":"1.1.0.0-open"
},
"man_service":{
"status":0,
"version":"1.2.7"
},
"cps_service":{
"status":0,
"version":"3.7.7"
}
},
"use_maven":true,
"proguard_keeplist":"proguard_keeplist"
}
|
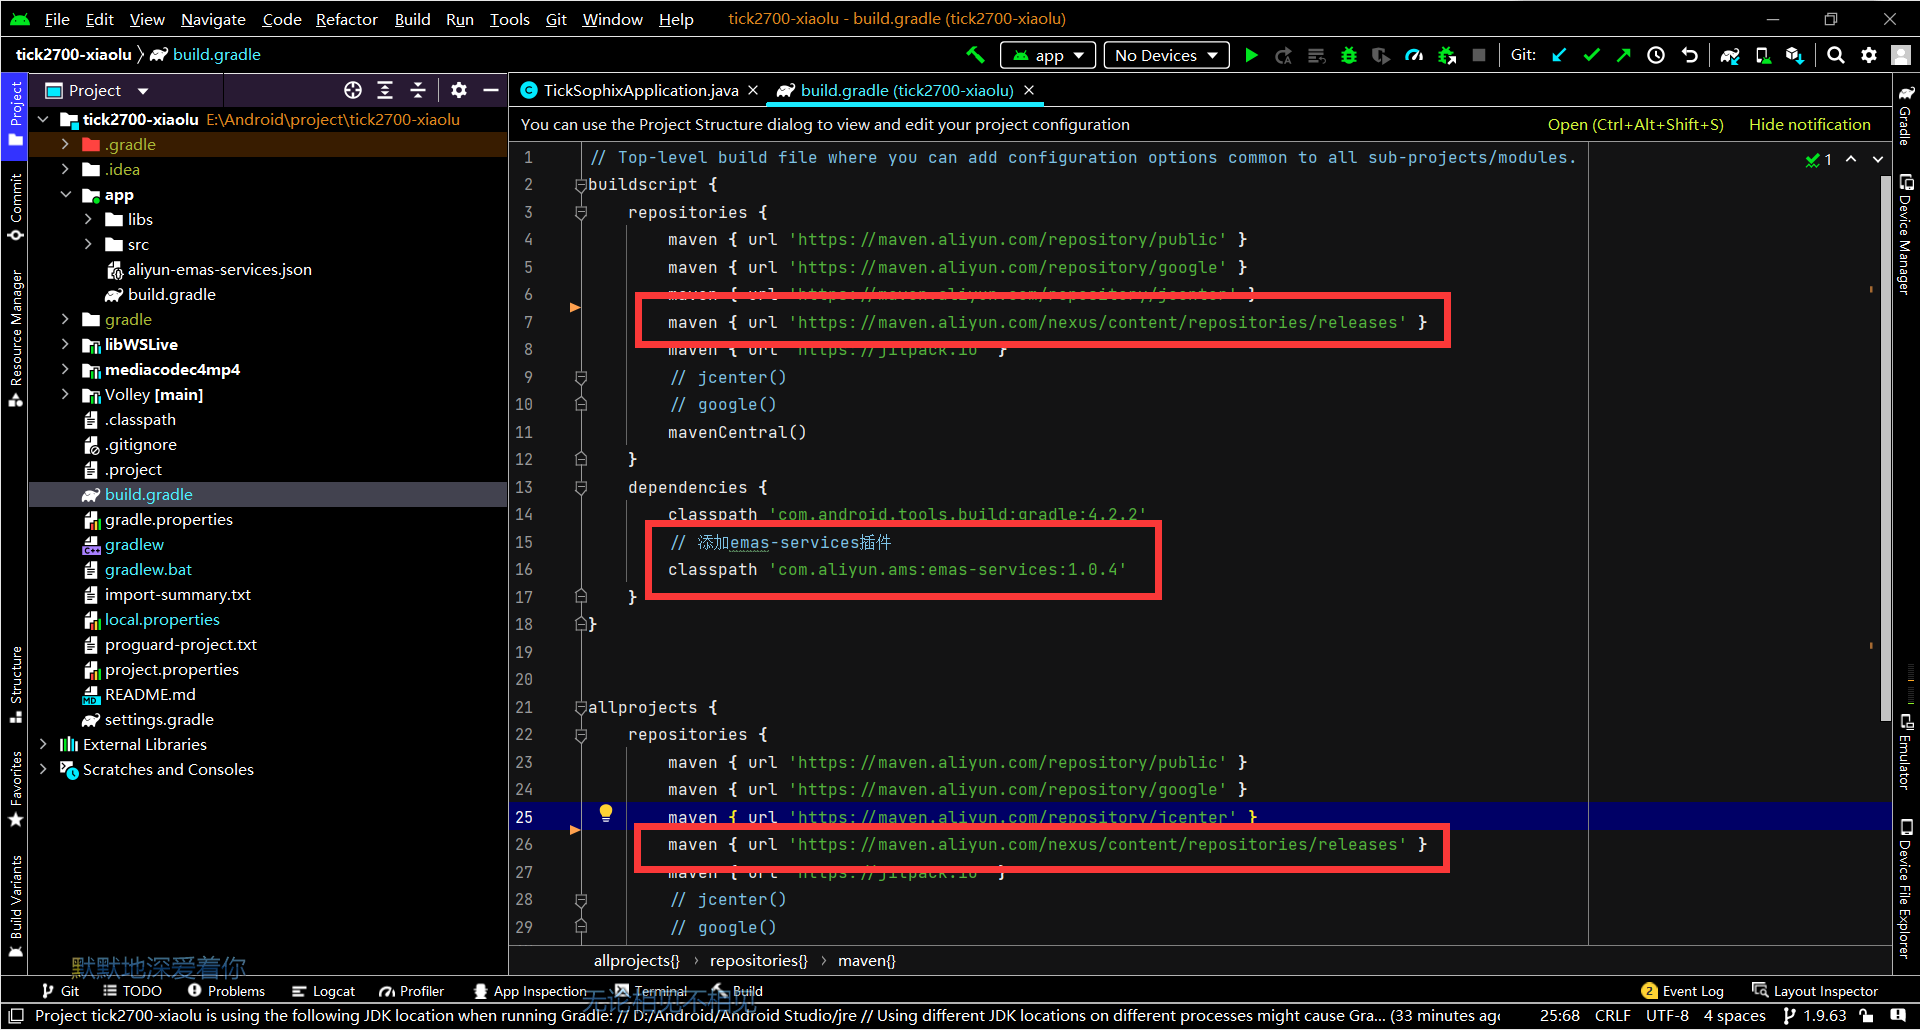
然后点击下一步,继续依照指示,在工程的build.gradle文件下添加阿里云热修复仓库和emas-services插件,我的build.gradle文件此时如下
1
2
3
4
5
6
7
8
9
10
11
12
13
14
15
16
17
18
19
20
21
22
23
24
25
26
27
28
29
30
31
32
33
34
35
36
37
38
|
buildscript {
repositories {
maven { url 'https://maven.aliyun.com/repository/public' }
maven { url 'https://maven.aliyun.com/repository/google' }
maven { url 'https://maven.aliyun.com/repository/jcenter' }
maven { url 'https://maven.aliyun.com/nexus/content/repositories/releases' }
maven { url "https://jitpack.io" }
mavenCentral()
}
dependencies {
classpath 'com.android.tools.build:gradle:4.2.2'
classpath 'com.aliyun.ams:emas-services:1.0.4'
}
}
allprojects {
repositories {
maven { url 'https://maven.aliyun.com/repository/public' }
maven { url 'https://maven.aliyun.com/repository/google' }
maven { url 'https://maven.aliyun.com/repository/jcenter' }
maven { url 'https://maven.aliyun.com/nexus/content/repositories/releases' }
maven { url "https://jitpack.io" }
mavenCentral()
}
}
task clean(type: Delete) {
delete rootProject.buildDir
}
|
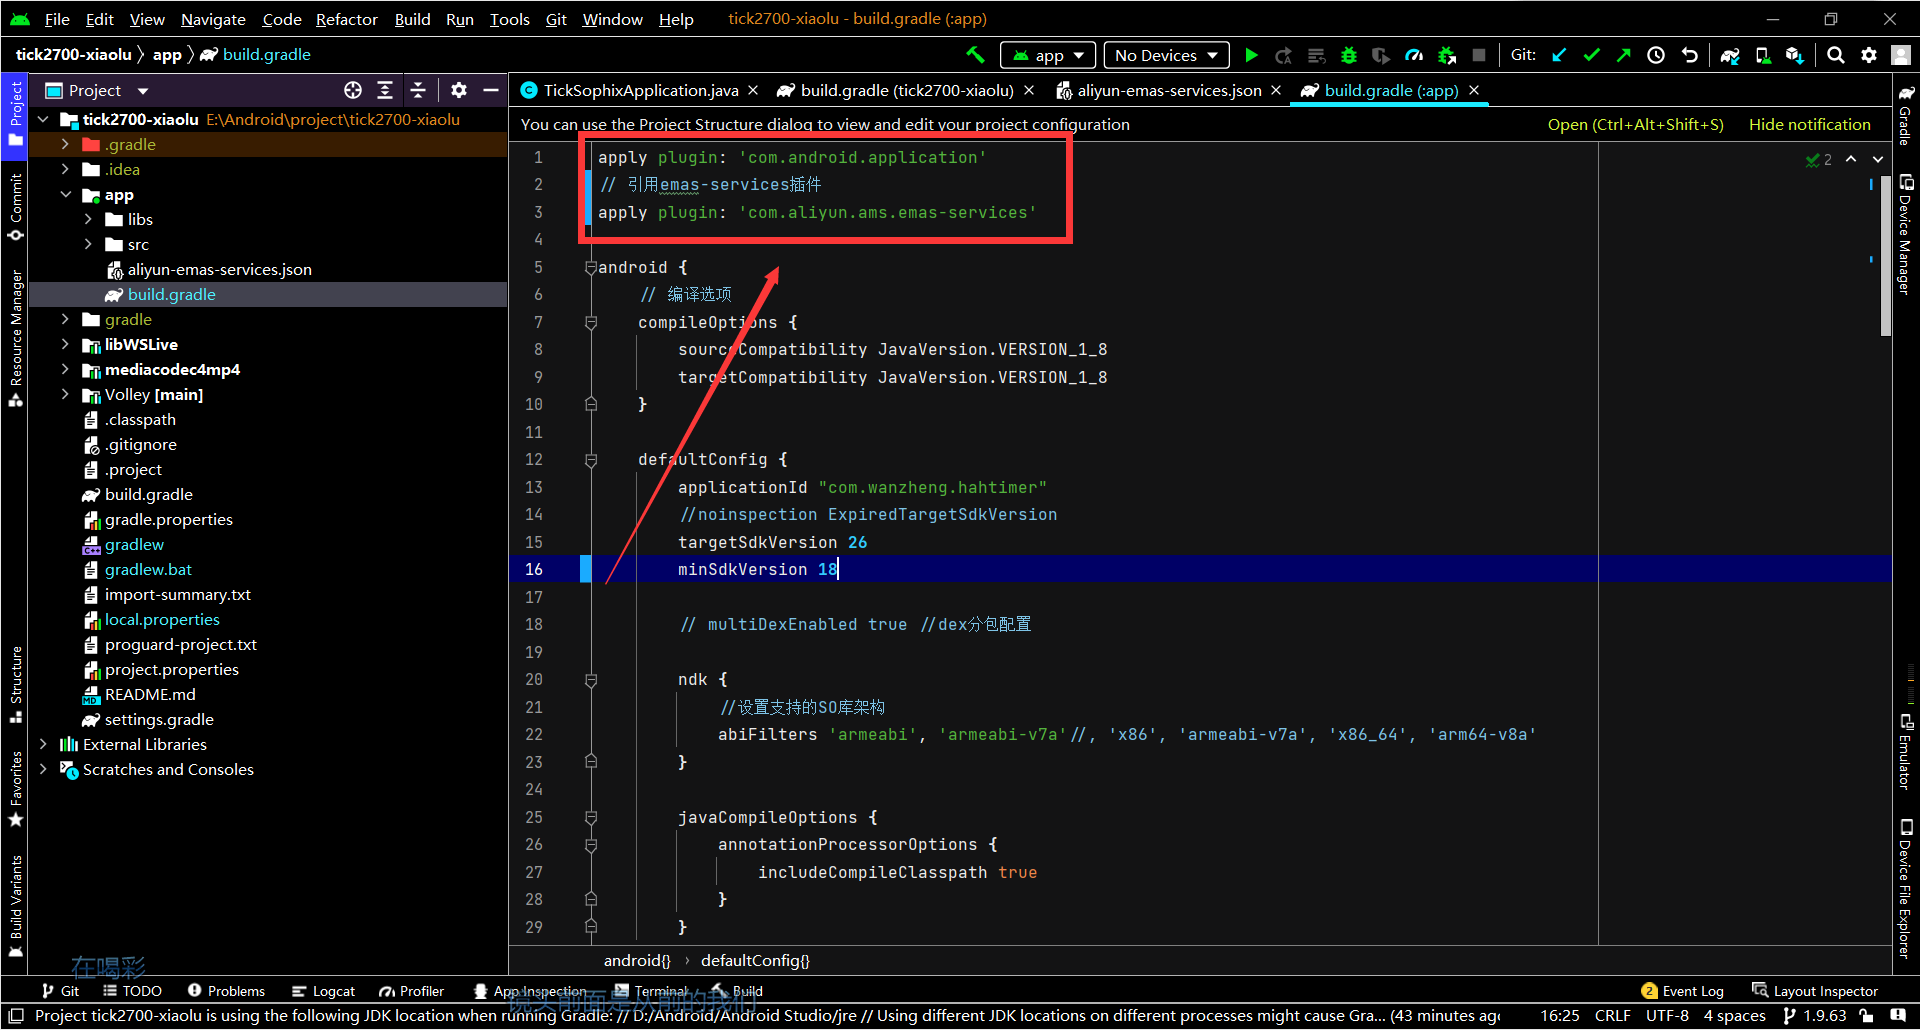
然后在app级的build.gradle中,在apply plugin: 'com.android.application'的下一行插入apply plugin: 'com.aliyun.ams.emas-services'
1
2
3
| apply plugin: 'com.android.application'
apply plugin: 'com.aliyun.ams.emas-services'
|
SDK稳健接入
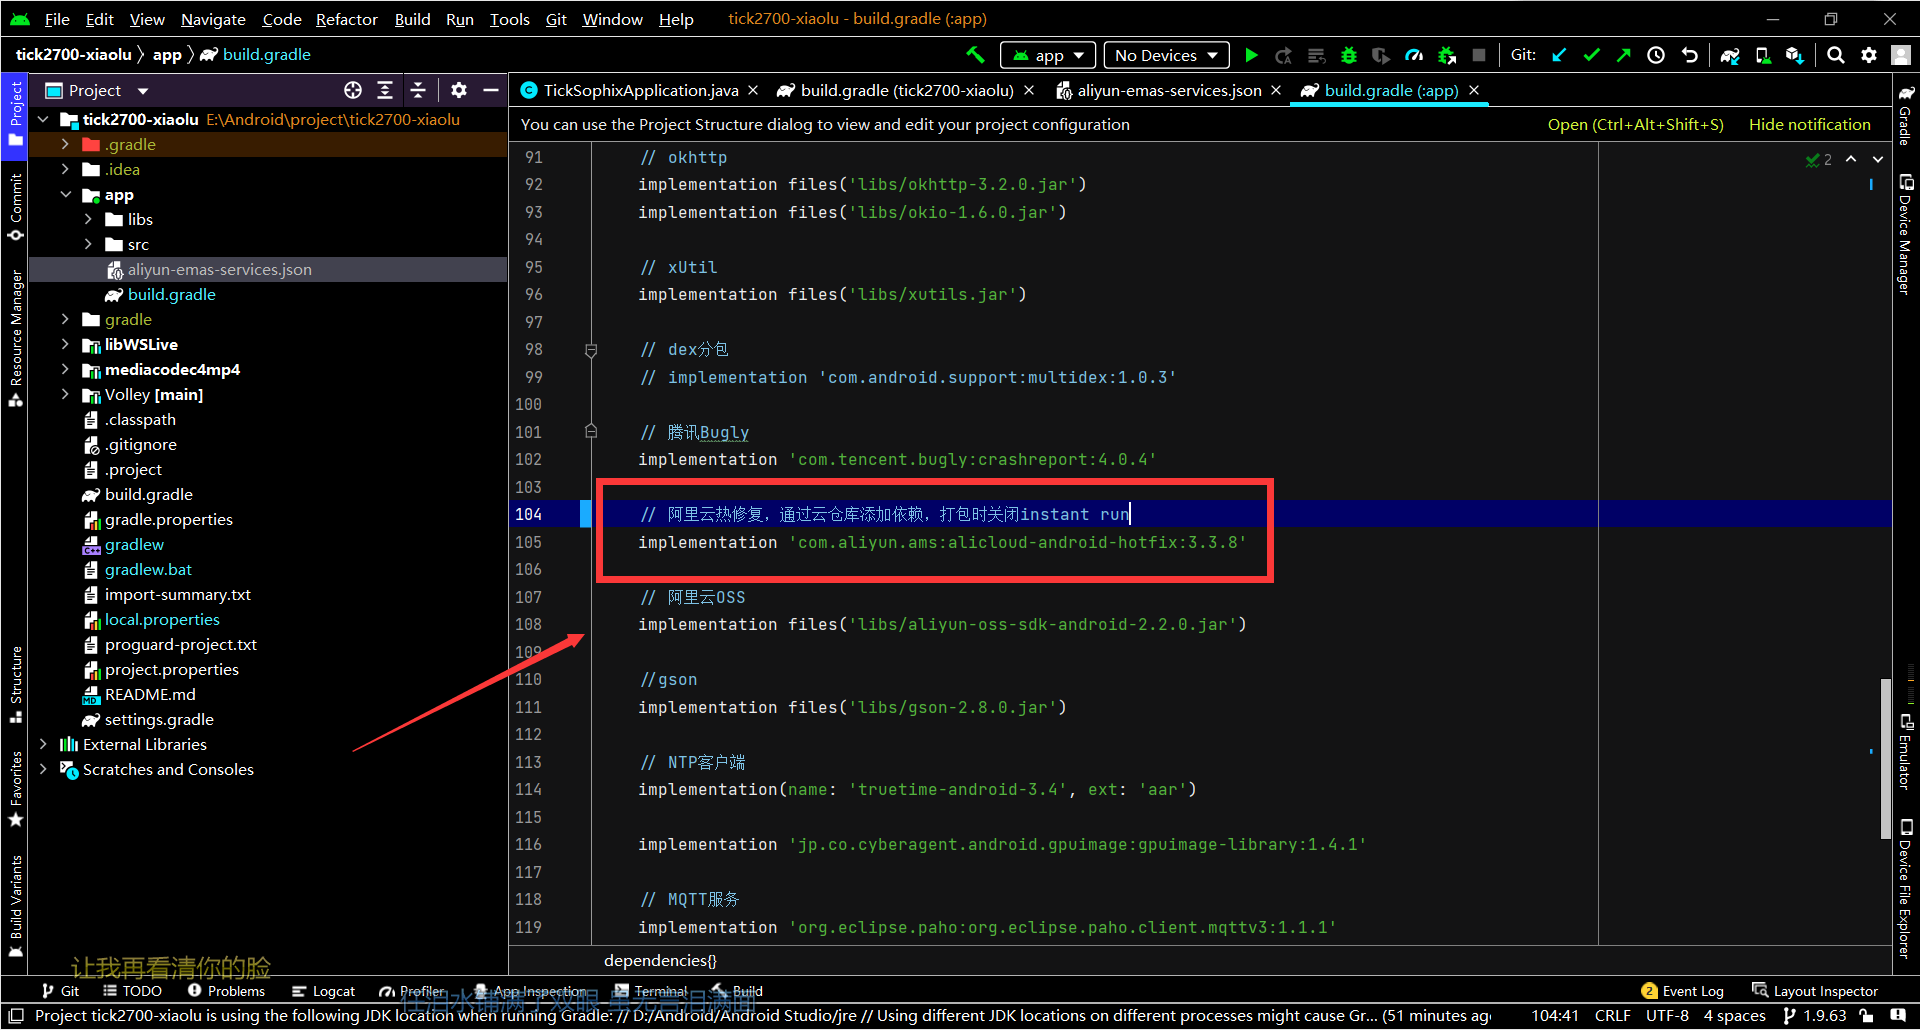
添加依赖,这里注意一下热修复依赖的版本要和配置文件中的版本一样
1
2
3
| dependencies {
implementation 'com.aliyun.ams:alicloud-android-hotfix:3.3.8'
}
|
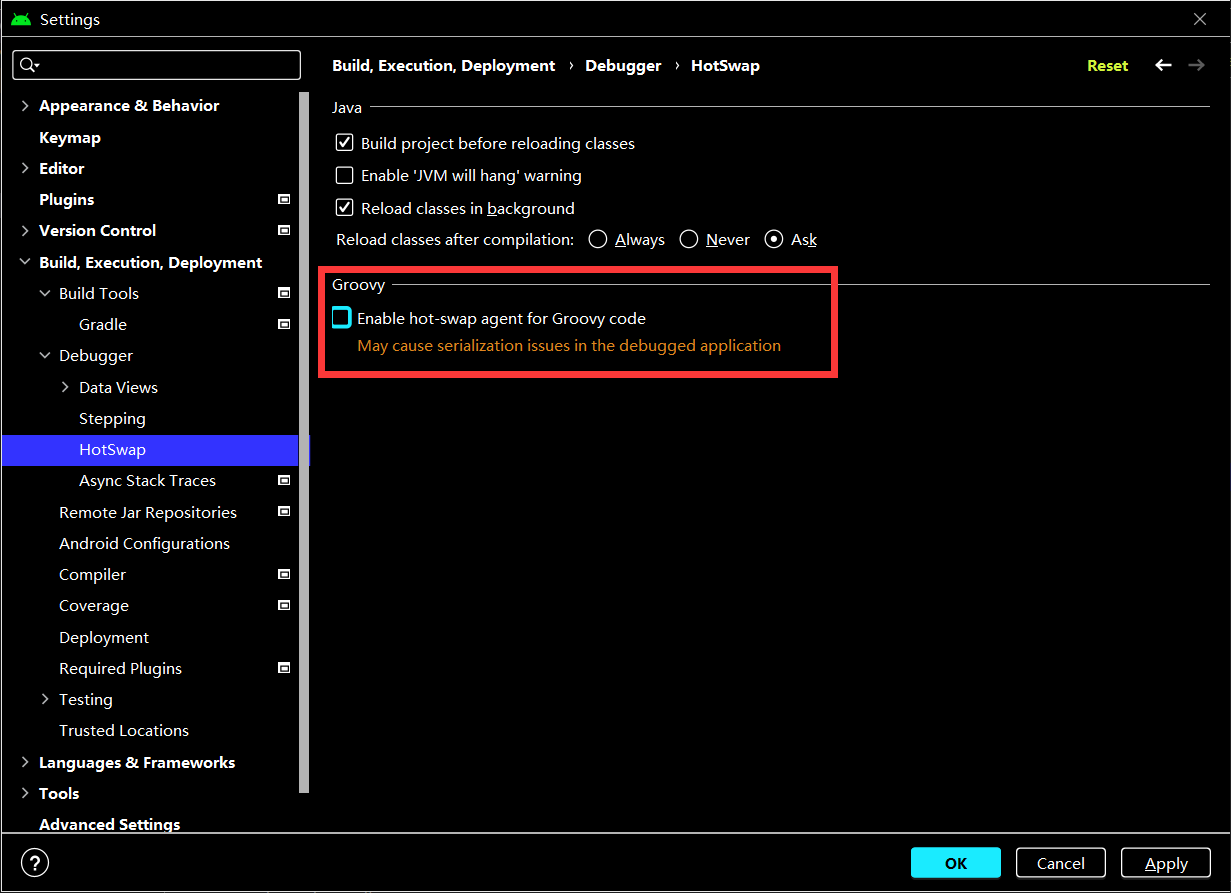
关闭instant run,在新版本的Android Studio中已经没有了instant run,将同级目录下的hot-swap关闭即可
- 使用android studio打包生成apk时,要关闭instant run。
- 使用gradle plugin版本高于4.2时,可能会自动开启资源优化。开启资源优化后,资源名称被混淆,会导致补丁工具在生成补丁时一直卡在”开始构建补丁…..”,无法正常解析apk包。解决方案:在gradle.properties 中新增android.enableResourceOptimizations=false,重新生成基线包和修复包,然后再生成补丁。
添加应用权限
1
2
3
4
| <uses-permission android:name="android.permission.INTERNET" />
<uses-permission android:name="android.permission.ACCESS_NETWORK_STATE" />
<uses-permission android:name="android.permission.ACCESS_WIFI_STATE" />
<uses-permission android:name="android.permission.READ_EXTERNAL_STORAGE"/>
|
配置AndroidManifest文件
1
2
3
4
5
6
7
8
9
| <meta-data
android:name="com.taobao.android.hotfix.IDSECRET"
android:value="App ID" />
<meta-data
android:name="com.taobao.android.hotfix.APPSECRET"
android:value="App Secret" />
<meta-data
android:name="com.taobao.android.hotfix.RSASECRET"
android:value="RSA密钥" />
|
混淆配置
1
2
3
4
5
6
7
8
9
10
| #基线包使用,生成mapping.txt
-printmapping mapping.txt
#生成的mapping.txt在app/build/outputs/mapping/release路径下,移动到/app路径下
#修复后的项目使用,保证混淆结果一致
#-applymapping mapping.txt
#hotfix
-keep class com.taobao.sophix.**{*;}
-keep class com.ta.utdid2.device.**{*;}
#防止inline
-dontoptimize
|
初始化
这里我创建了一个TickSophixApplication类继承SophixApplication,将,并将清单文件中application标签的name改成了TickSophixApplication,原有的Application通过注解的方式添加在TickSophixApplication中
1
2
3
4
| @Keep
@SophixEntry(TickApplication.class)
static class RealApplicationStub {
}
|
而初始化热修复功能,官方建议在attachBaseContext()中进行,这里请注意,AppConfig.isDebugMode是我在其它类中自定义的一个boolean值
1
2
3
4
5
6
7
8
9
10
11
12
13
14
15
16
17
18
19
20
21
22
23
24
25
26
27
28
29
30
31
32
33
34
35
36
37
38
39
40
41
42
43
44
45
46
47
48
49
50
51
52
53
54
55
56
57
58
| @Override
protected void attachBaseContext(Context base) {
super.attachBaseContext(base);
initSophix();
}
private void initSophix() {
private void initSophix() {
String appVersion = "XL.1.9.63";
try {
PackageInfo packageInfo = getPackageManager().getPackageInfo(this.getPackageName(), 0);
appVersion = packageInfo.versionName;
} catch (PackageManager.NameNotFoundException e) {
e.printStackTrace();
}
List<String> tags = new ArrayList<>();
if (AppConfig.isDebugMode){
tags.add("debug");
} else {
tags.add("release");
}
SophixManager instance = SophixManager.getInstance();
instance.setContext(this)
.setAppVersion(appVersion)
.setSecretMetaData("IDSECRET", "APPSECRET", "RSASECRET")
.setEnableDebug(AppConfig.isDebugMode)
.setEnableFullLog()
.setPatchLoadStatusStub(new PatchLoadStatusListener() {
@SuppressLint("LongLogTag")
@Override
public void onLoad(final int mode, final int code, final String info, final int handlePatchVersion) {
if (code == PatchStatus.CODE_LOAD_SUCCESS) {
Log.i(TAG, "onLoad: sophix load patch success!");
} else if (code == PatchStatus.CODE_LOAD_RELAUNCH) {
Log.i(TAG, "sophix preload patch success. restart app to make effect.");
}
}
})
.setTags(tags)
.initialize();
}
|
检查热修复时,只需要调用
1
2
3
4
|
SophixManager.getInstance().queryAndLoadNewPatch();
|
整体看一下TickSophixApplicationd的代码
1
2
3
4
5
6
7
8
9
10
11
12
13
14
15
16
17
18
19
20
21
22
23
24
25
26
27
28
29
30
31
32
33
34
35
36
37
38
39
40
41
42
43
44
45
46
47
48
49
50
51
52
53
54
55
56
57
58
59
60
61
62
63
64
65
66
67
68
69
70
71
72
73
74
75
76
77
78
79
|
public class TickSophixApplication extends SophixApplication {
private static final String TAG = "TickSophixApplication(xxin)";
@Keep
@SophixEntry(TickApplication.class)
static class RealApplicationStub {
}
@Override
protected void attachBaseContext(Context base) {
super.attachBaseContext(base);
initSophix();
}
private void initSophix() {
private void initSophix() {
String appVersion = "XL.1.9.63";
try {
PackageInfo packageInfo = getPackageManager().getPackageInfo(this.getPackageName(), 0);
appVersion = packageInfo.versionName;
} catch (PackageManager.NameNotFoundException e) {
e.printStackTrace();
}
List<String> tags = new ArrayList<>();
if (AppConfig.isDebugMode){
tags.add("debug");
} else {
tags.add("release");
}
SophixManager instance = SophixManager.getInstance();
instance.setContext(this)
.setAppVersion(appVersion)
.setSecretMetaData("IDSECRET", "APPSECRET", "RSASECRET")
.setEnableDebug(AppConfig.isDebugMode)
.setEnableFullLog()
.setPatchLoadStatusStub(new PatchLoadStatusListener() {
@SuppressLint("LongLogTag")
@Override
public void onLoad(final int mode, final int code, final String info, final int handlePatchVersion) {
if (code == PatchStatus.CODE_LOAD_SUCCESS) {
Log.i(TAG, "onLoad: sophix load patch success!");
} else if (code == PatchStatus.CODE_LOAD_RELAUNCH) {
Log.i(TAG, "sophix preload patch success. restart app to make effect.");
}
}
})
.setTags(tags)
.initialize();
}
}
|
发布补丁包
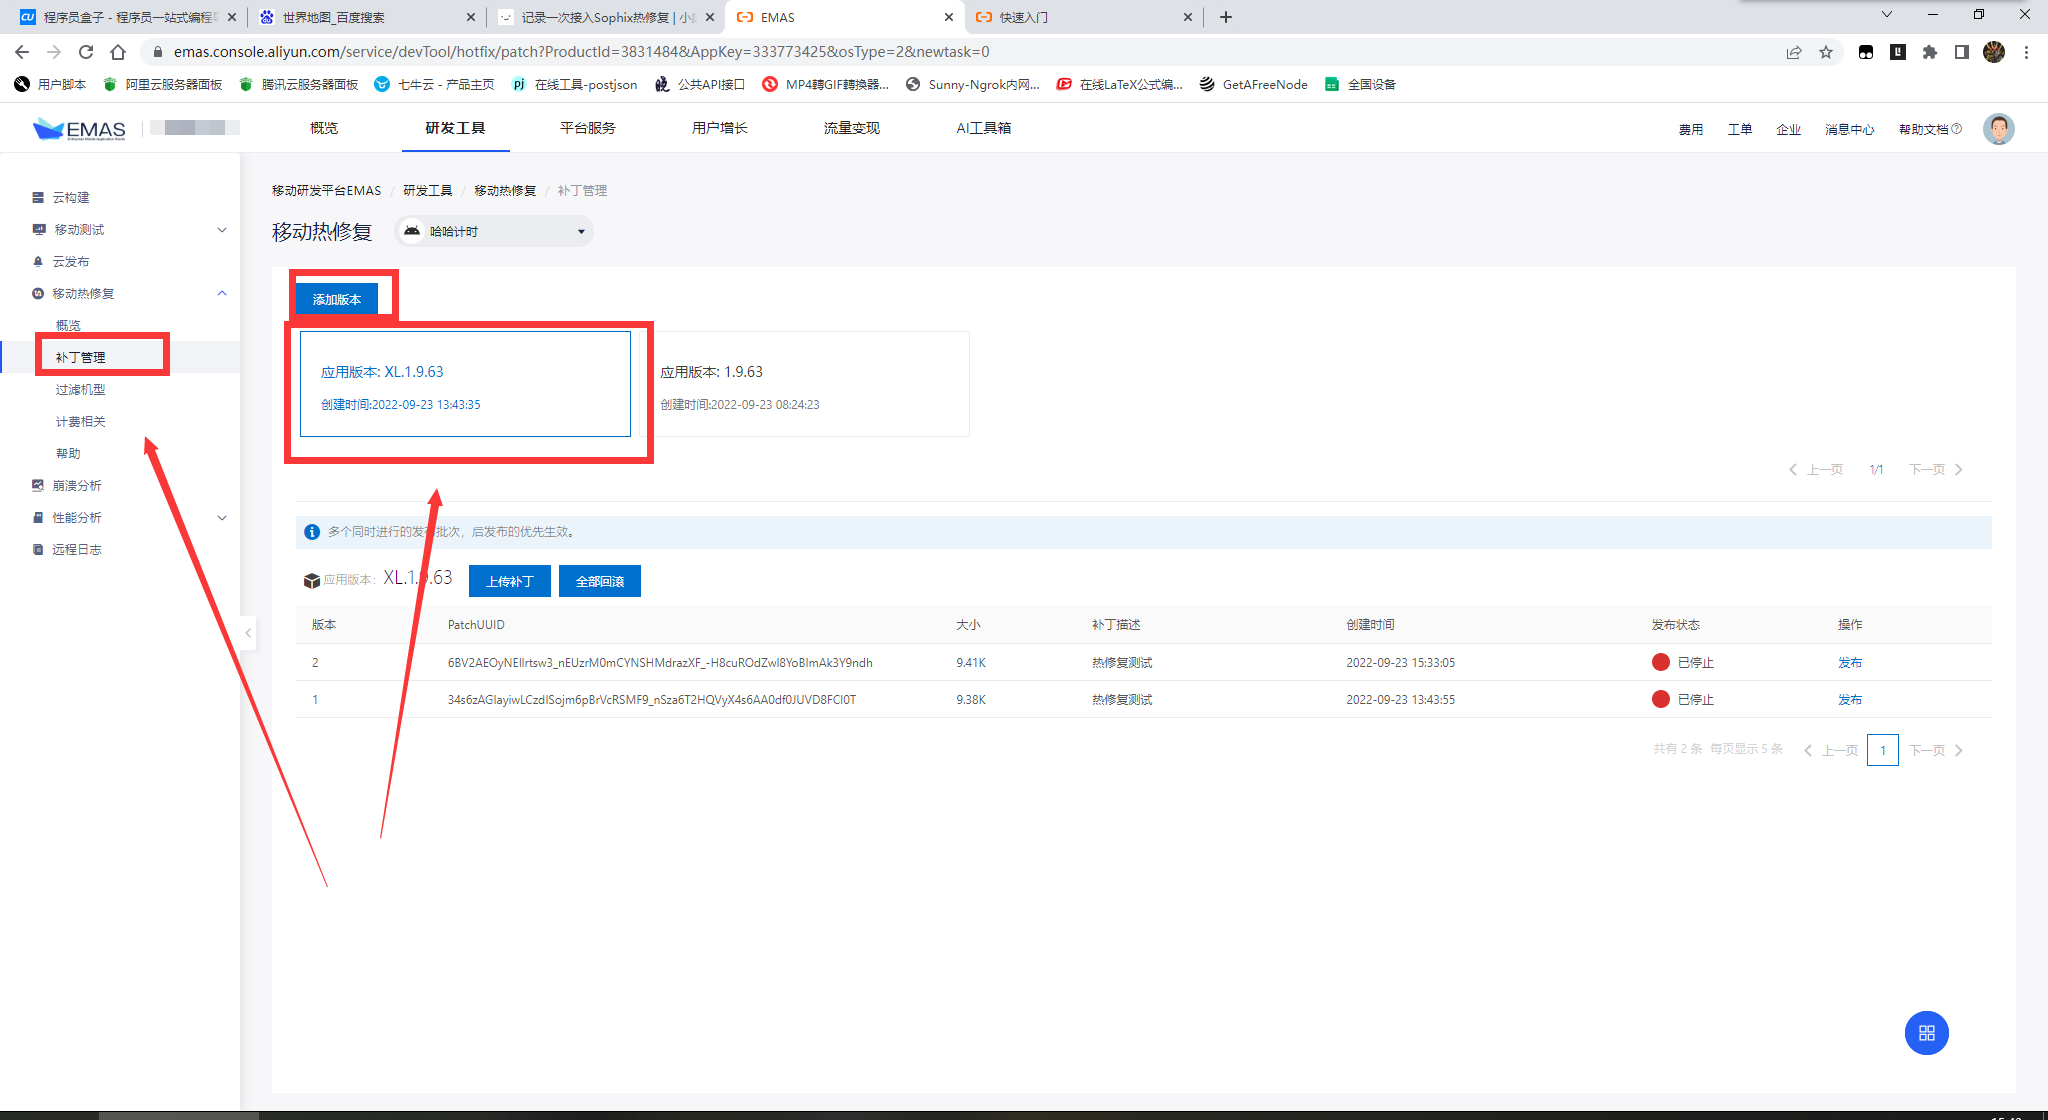
在补丁管理中创建添加软件版本,这里的版本应与SophixManager初始化时setAppVersion方法中传递的版本一致
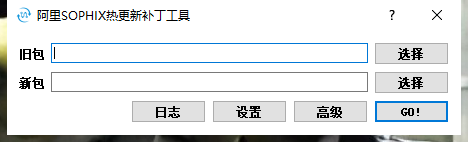
下载打包工具,生成补丁,windows打包工具(其他系统请自行下载)
选择旧的基准包和修改后的新包,在高级选项中取消勾选“检查初始化”,点击“Go”开始生成补丁包
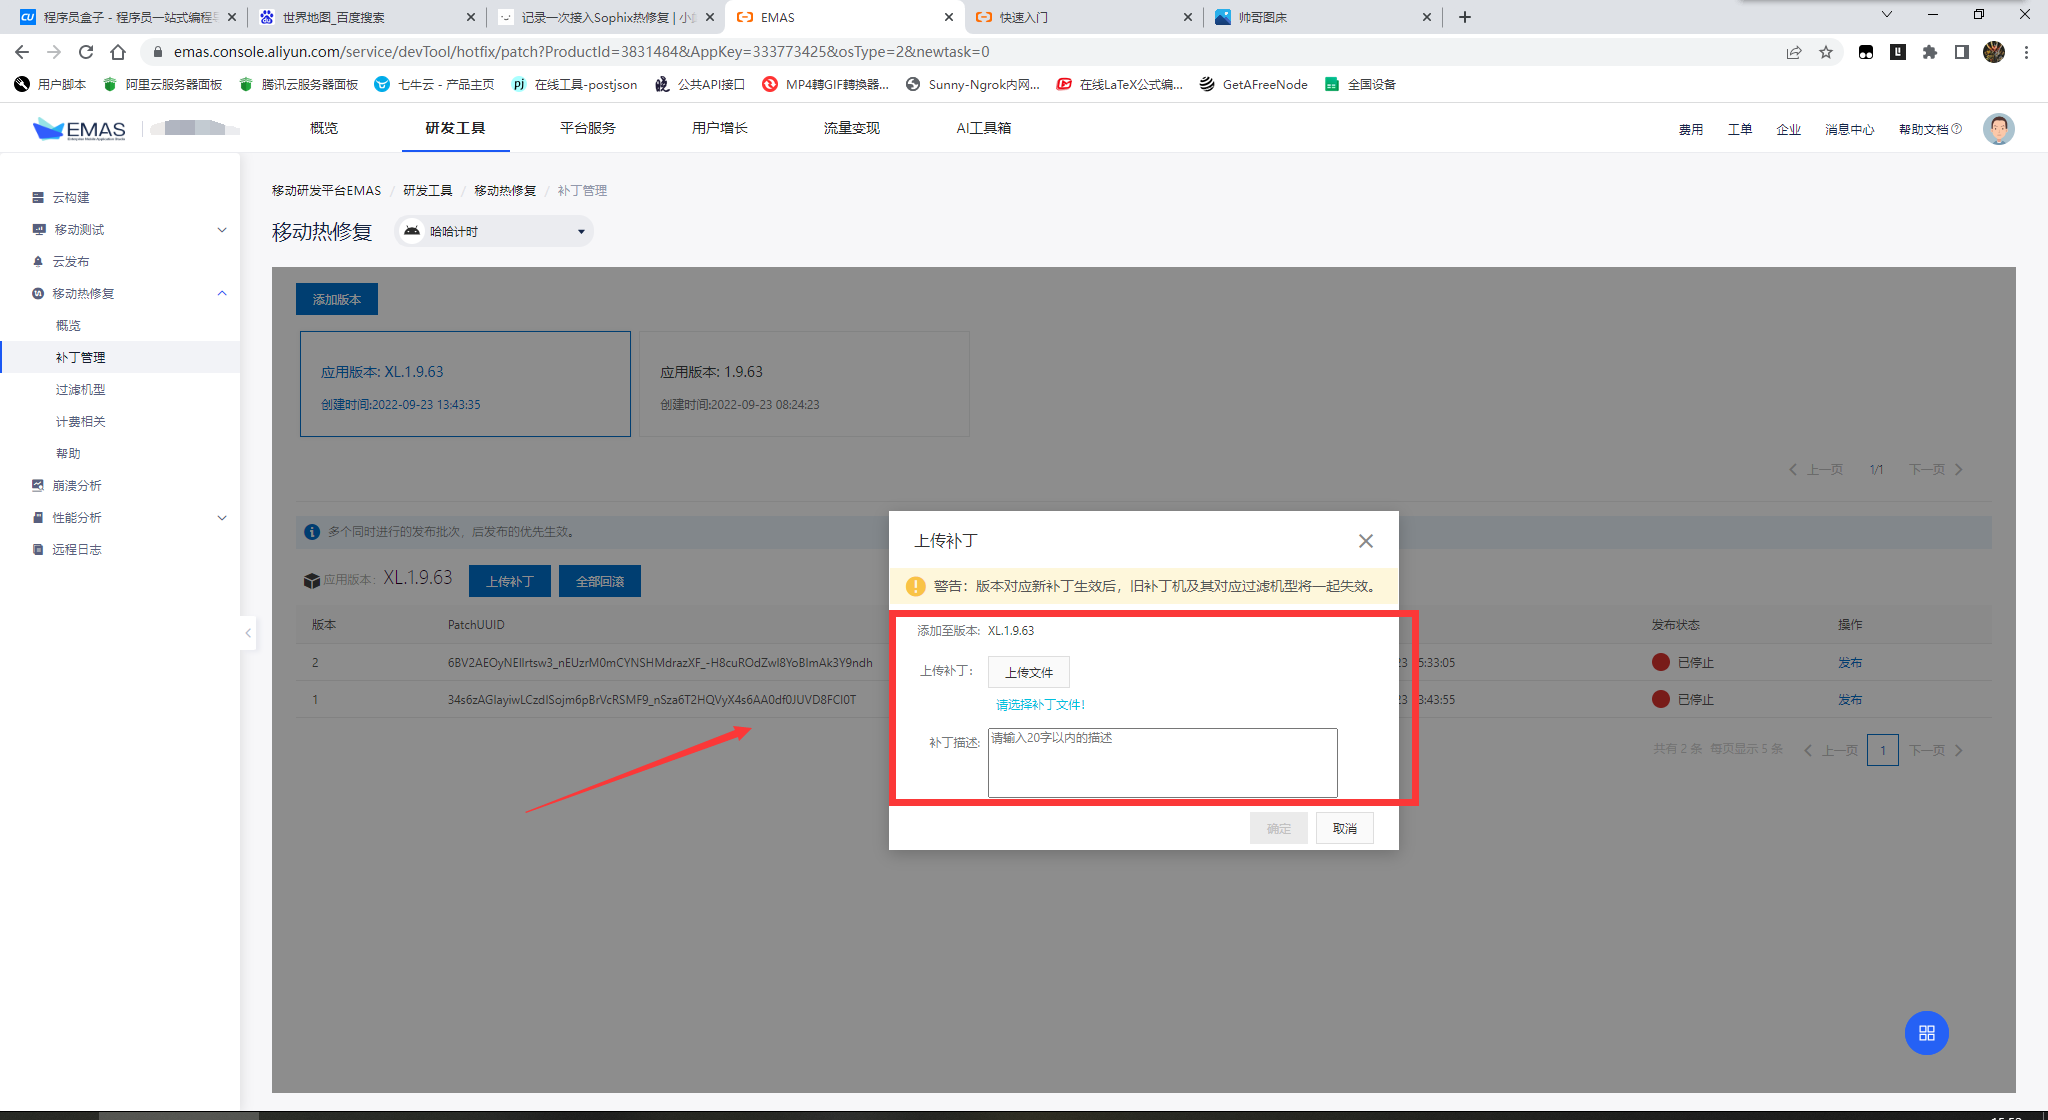
将生成的补丁包上传EMAS并发布即可
参考
EMAS Android 统一接入
SDK稳健接入
快速入门
SDK API